Hybrid Activations
Hybrid activations allow participants to join either virtually or in person, it contains event details such as the venue address and virtual access links. When guests RSVP, a digital ticket is generated for on-site entry.
Creating a Hybrid Activation
To begin, navigate to the Activations tab and select Create Activation.
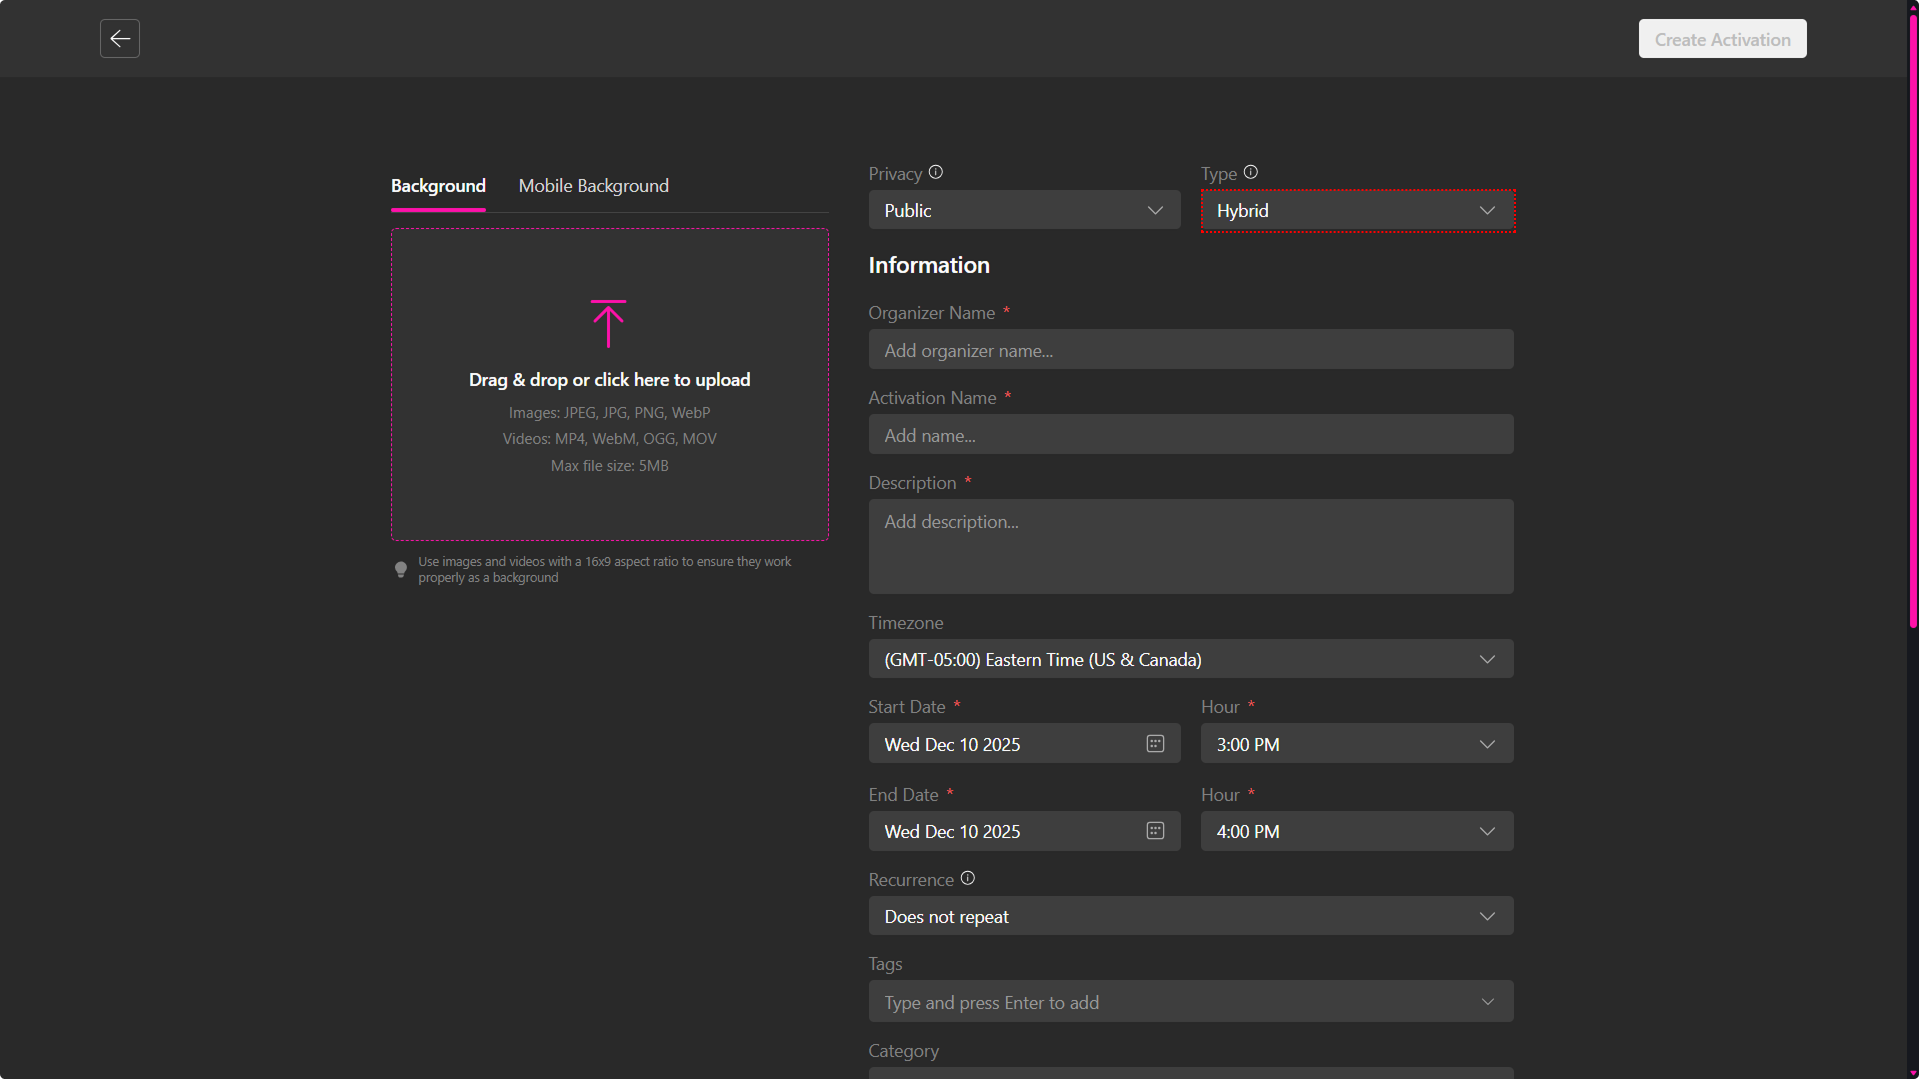
This opens the activation creation interface, where you can configure the following details:
- Activation name and description
- Privacy settings
- Activation type (virtual, in-person, or hybrid)
- Location and scheduling parameters
Privacy
Choose the appropriate visibility level for your activation:
- Public: Accessible to all users on the platform and automatically listed in the Community tab.
- Private: Restricted to invited participants or users with explicit access permissions.
- Unlisted: Not publicly listed; accessible only to individuals who receive the direct activation link.
Activation Types
Choose the activation format you’d like to set up, in this case, Hybrid:
- Virtual: Hosted entirely online within XRHUB’s digital environment.
- Hybrid: Combines virtual and physical participation.
- In-Person: Conducted exclusively at a physical location.
Information
Fill the necessary information for the activation:
- Name: A clear and descriptive title.
- Description: A concise summary of the session’s theme or objectives.
- Timezone: Ensures accurate scheduling across regions.
- Start Date / Time: Specifies when the activation begins.
- End Date / Time: Defines the session’s duration.
- Recurrence:
- Does not repeat: Single-instance event.
- Daily / Weekly / Monthly: Automatically generates recurring sessions.
- Tags: Keywords to improve discoverability (e.g., “Workshop,” “Training,” “Networking”).
- Category: Used to categorize Activations in the Community tab, making it easier for users to browse by topic or collection.
- Virtual Location: Choose a Verse (a published XRHUB virtual environment) or add a custom URL (e.g., Zoom, Google Meet).
- Physical Address:
- Country, State/Province & City – Location details
- Street Address – Venue address
- Location Name – e.g., Convention Center
- Postal Code – ZIP or postal code
- Image/Video Upload: Add visual assets. Supported formats:
- Images: JPEG, JPG, PNG, WebP
- Videos: MP4, WebM, OGG, MOV
- Max file size: 5MB
- Recommended aspect ratio: 16:9
After this, you can either publish the activation as-is or continue refining it in the Activation Management section.
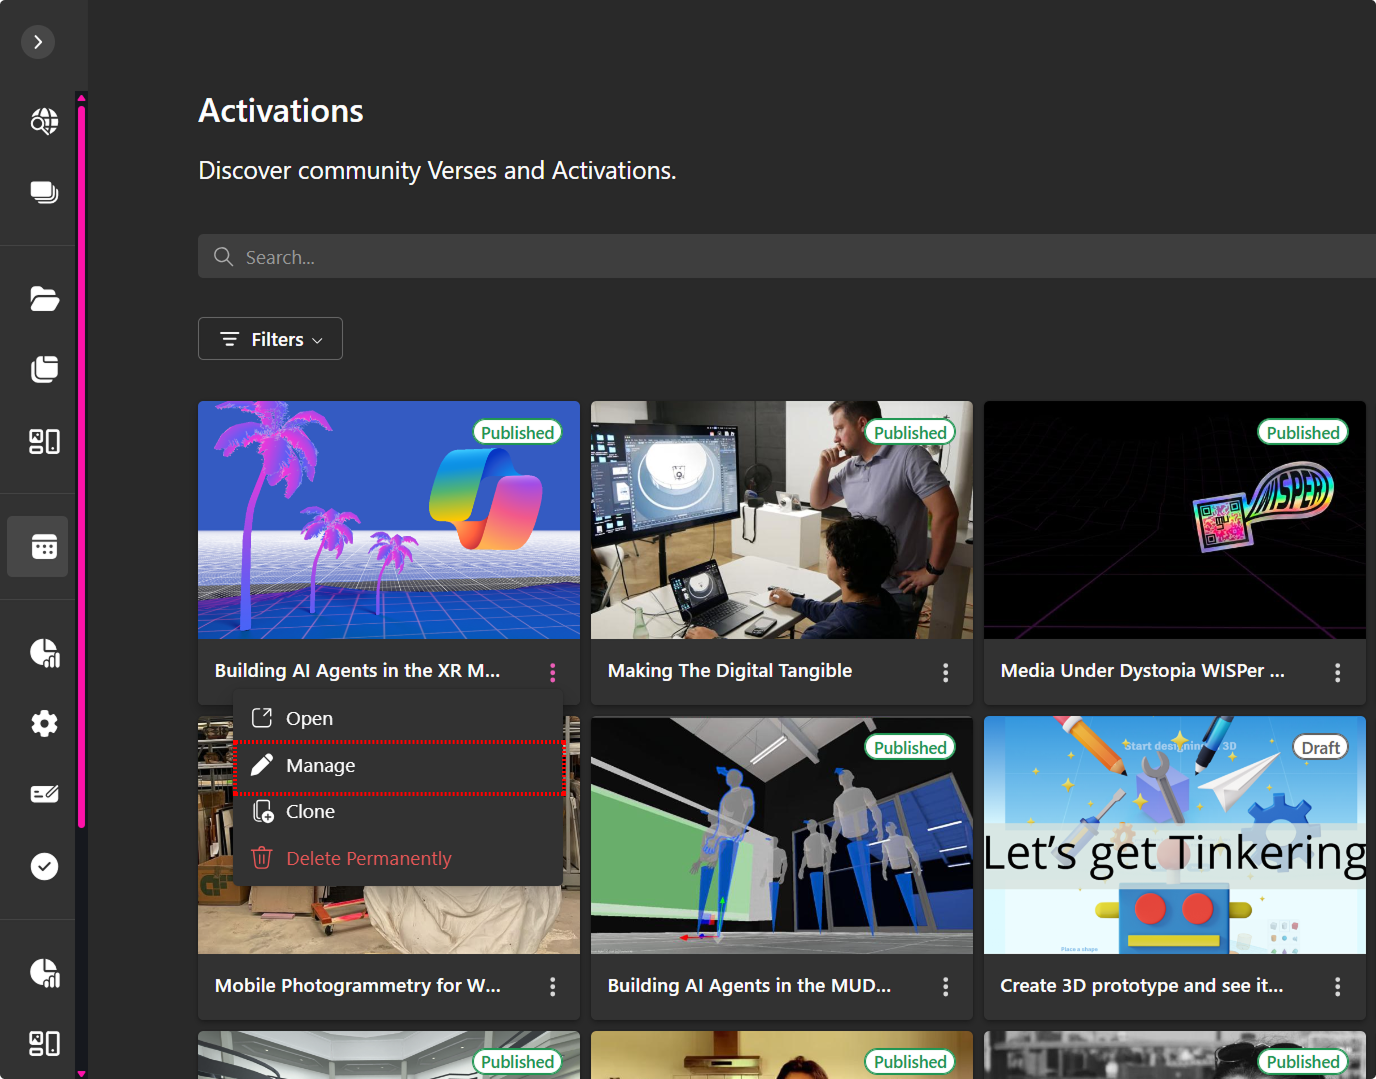
Managing and Publishing your In-Person Activations
When you create an activation, it’s automatically saved as a Draft. Drafts remain hidden from attendees until they’re published.
From the Activations Dashboard, you can manage your drafts using the quick-action menu.
Click the Manage button in the dropdown to open the configuration page or publish your activation.
The top navigation menu provides access to specialized tabs for streamlined control over key settings.
Overview
Provides a centralized view of the activation.
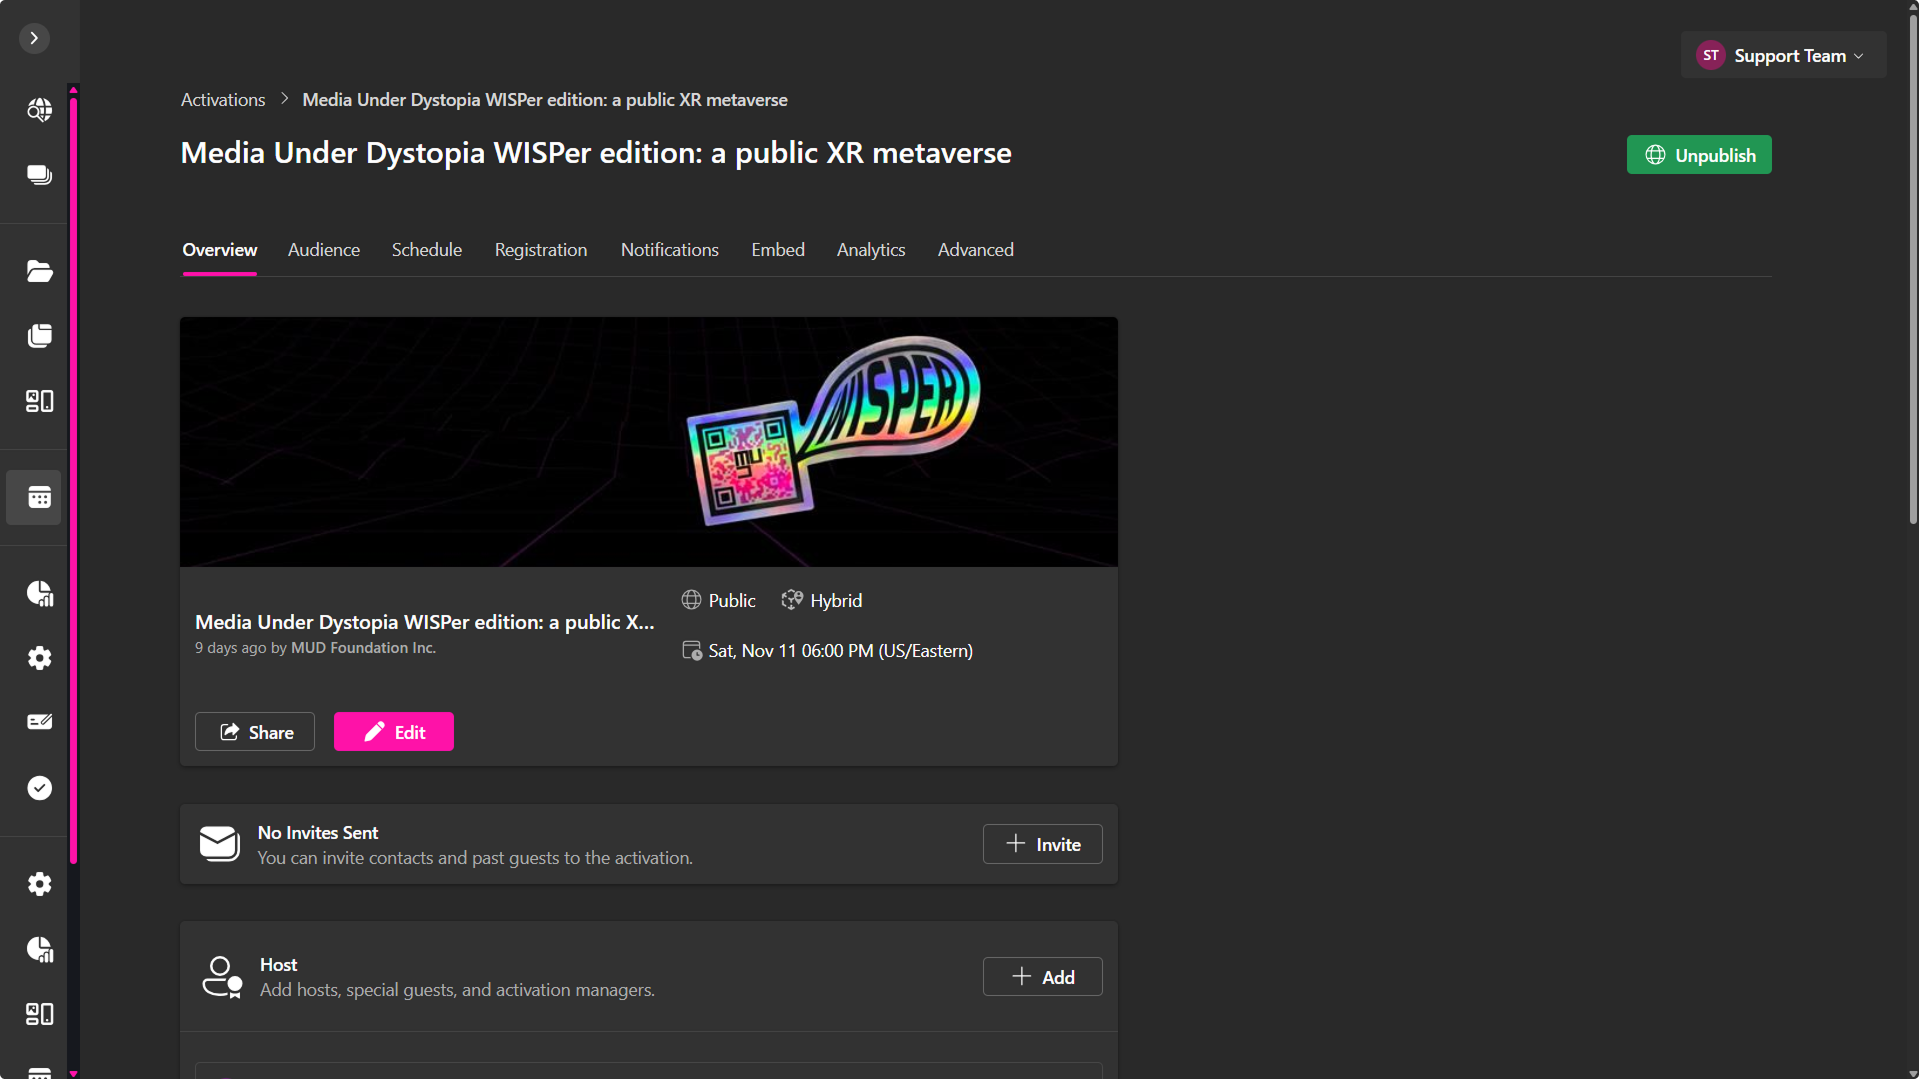
From here, you can:
- Edit activation details
- Manage invitations
- Add hosts
- Preview the activation page
Edit Activation Information
Update core details and share the activation link:
- Share: Links to distribute the activation link.
- Edit: Modify privacy, activation type, name, description, timezone, schedule, recurrence, tags, physical location and virtual location.
Invitations
Invite participants via:
- Manual entry
- CSV upload
- Reuse of past contacts
Hosts can also be invited. If the activation uses a Verse, hosts receive permissions to help manage the verse.
Activation Page
Preview the attendee-facing landing page. Use View Full Activation Page to confirm layout and content.
Audience
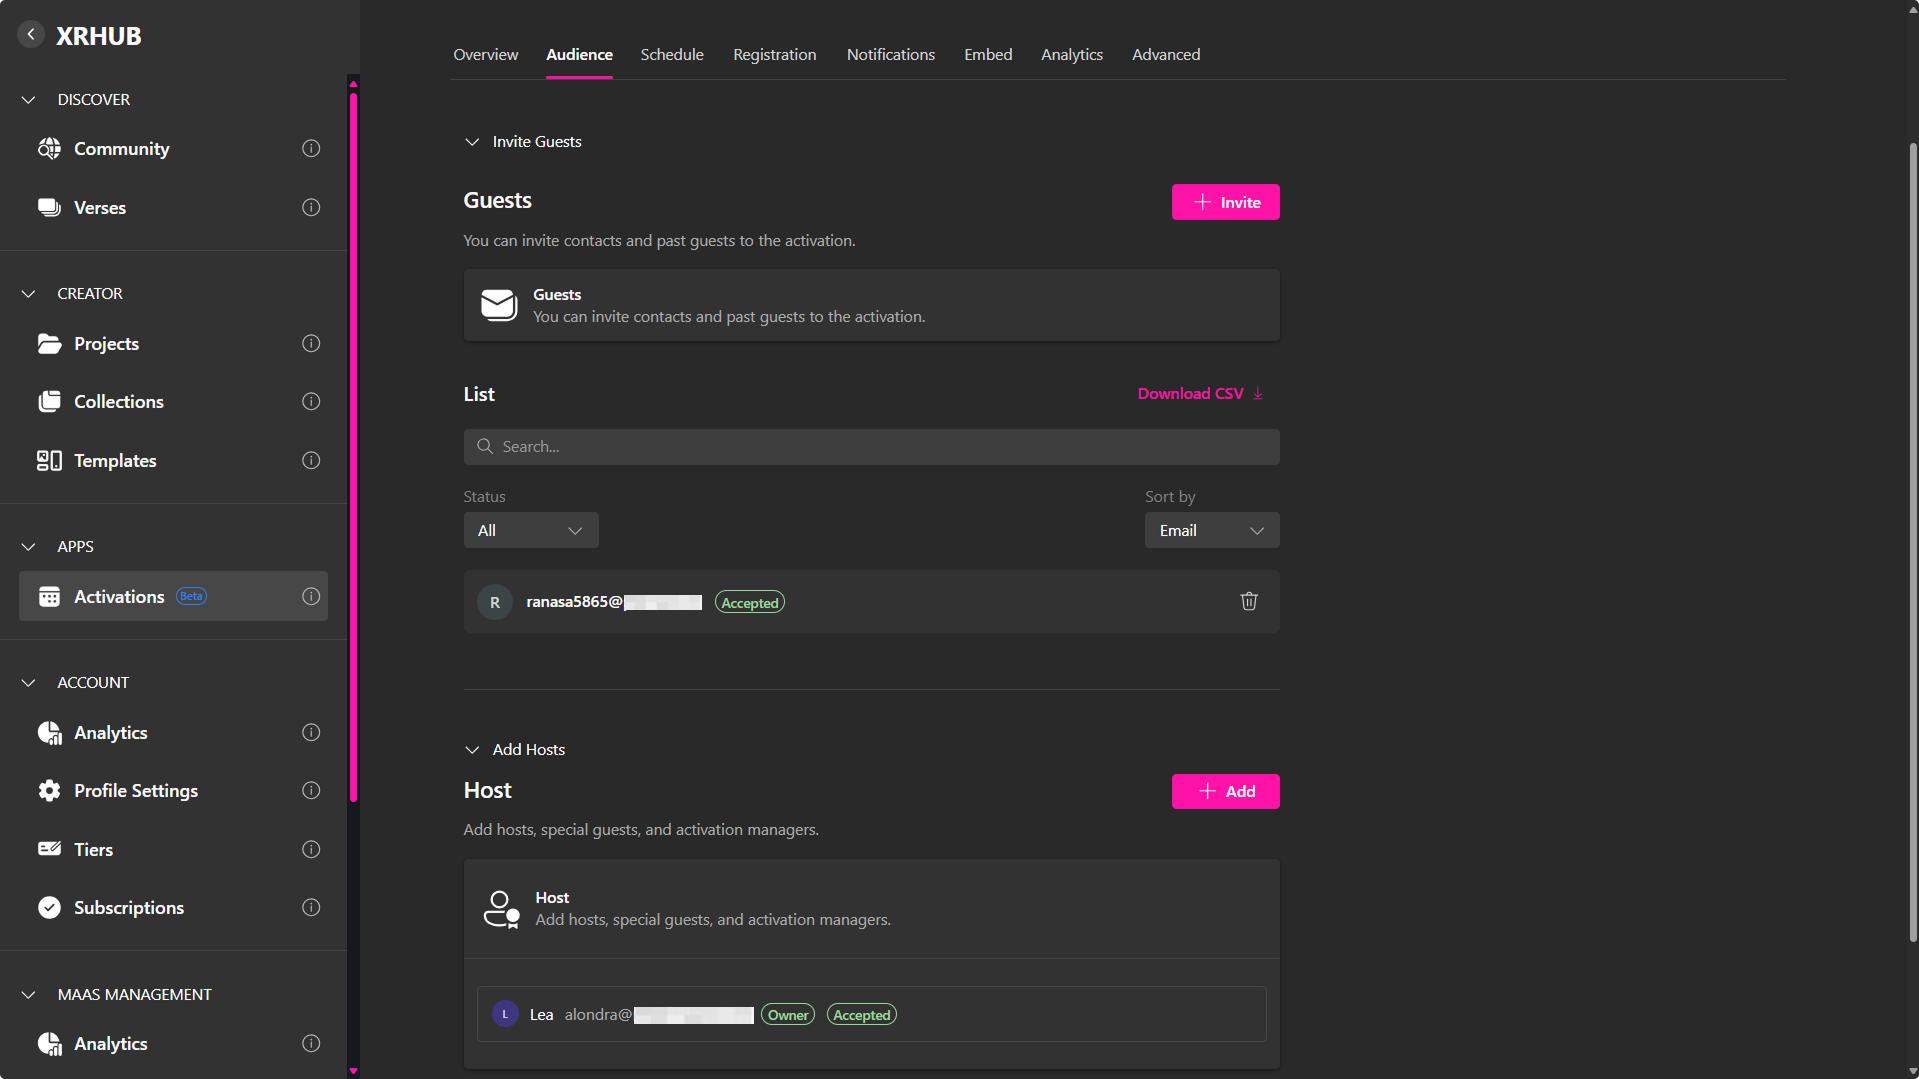
Manage guests and hosts:
Guests
- Invite guests via email or CSV upload.
- Before Publishing:
- Invitations are saved but not sent.
- After Publishing:
- Invitations are automatically sent.
- RSVP statuses update in real time.
- If the event includes tickets, invited guests can access it without payment.
Hosts
Assign host roles to users with the following permissions:
-
Manager:
- Full editing access to the activation.
- Receives an email notification.
- Can access the activation from their Activation tab.
-
Host:
- For virtual activations inside a verse.
- Grants permission to manage the metaverse room.
Schedule
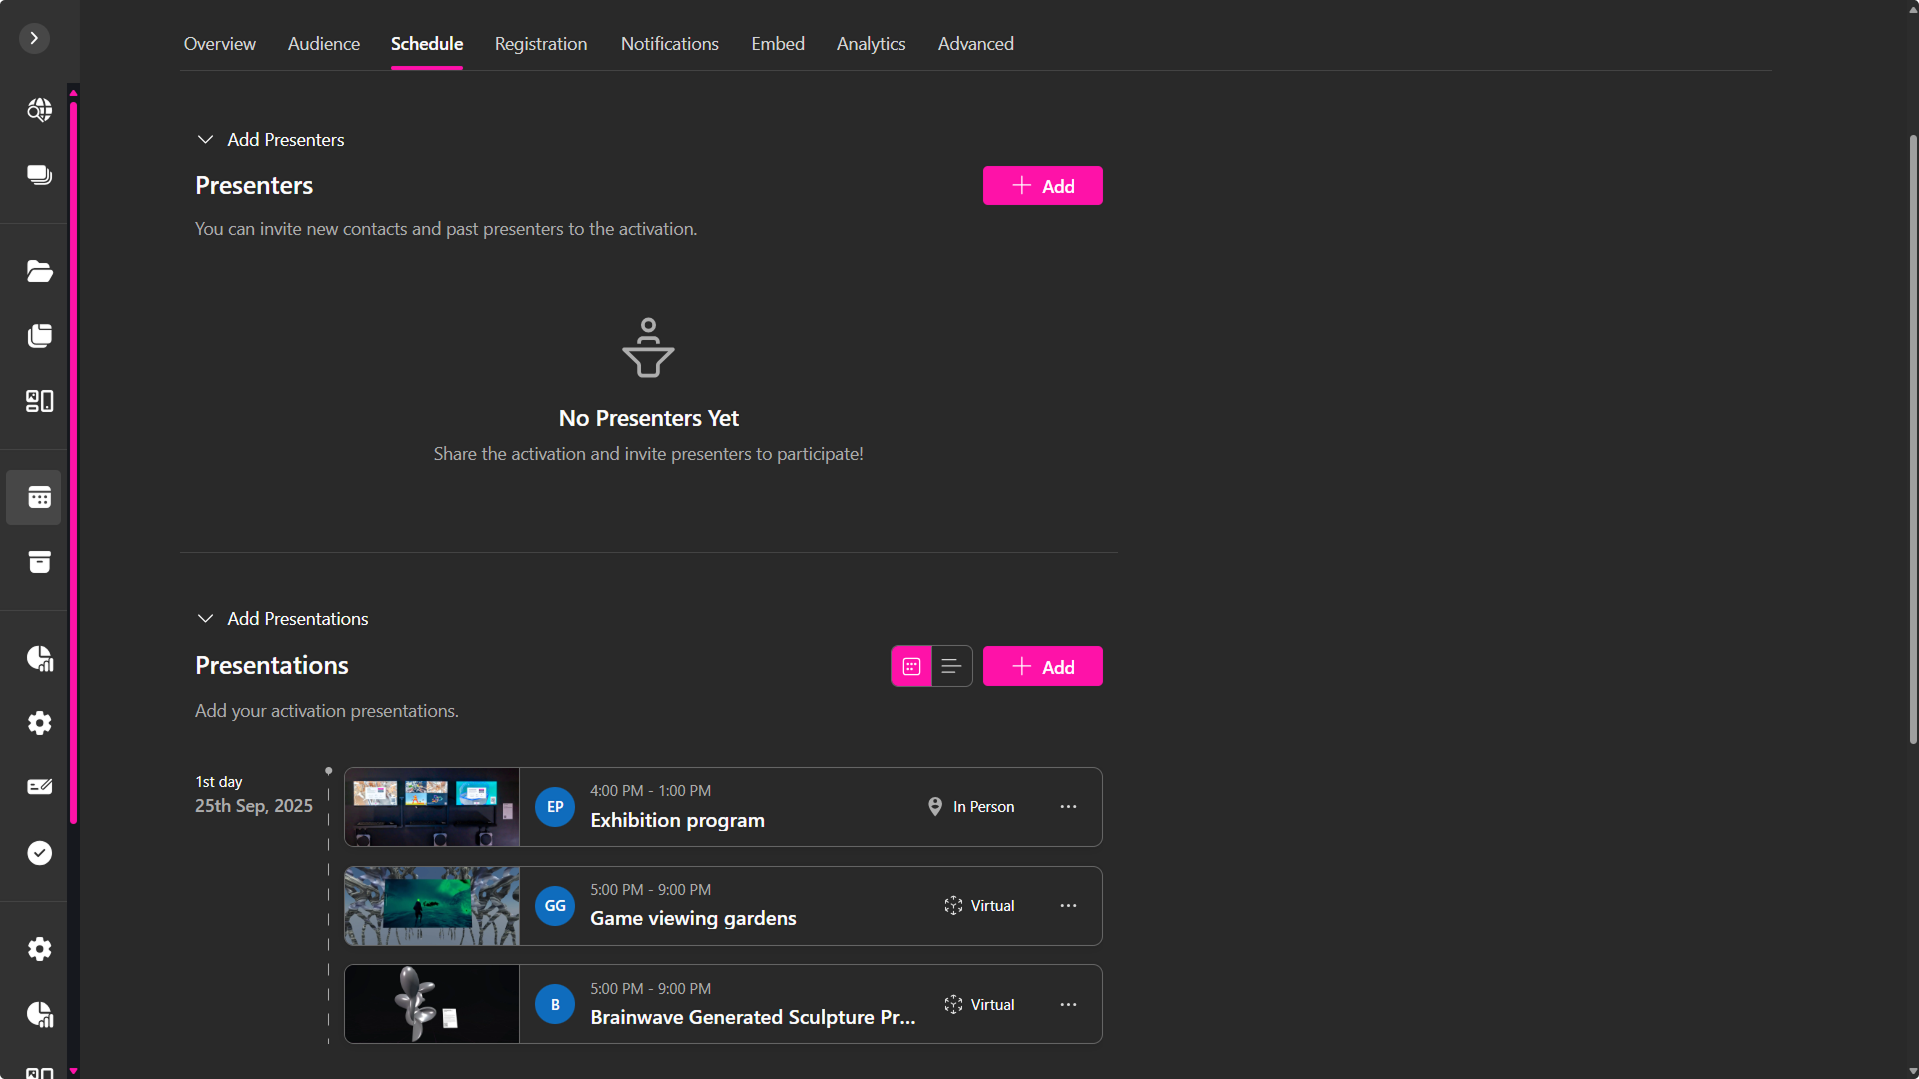
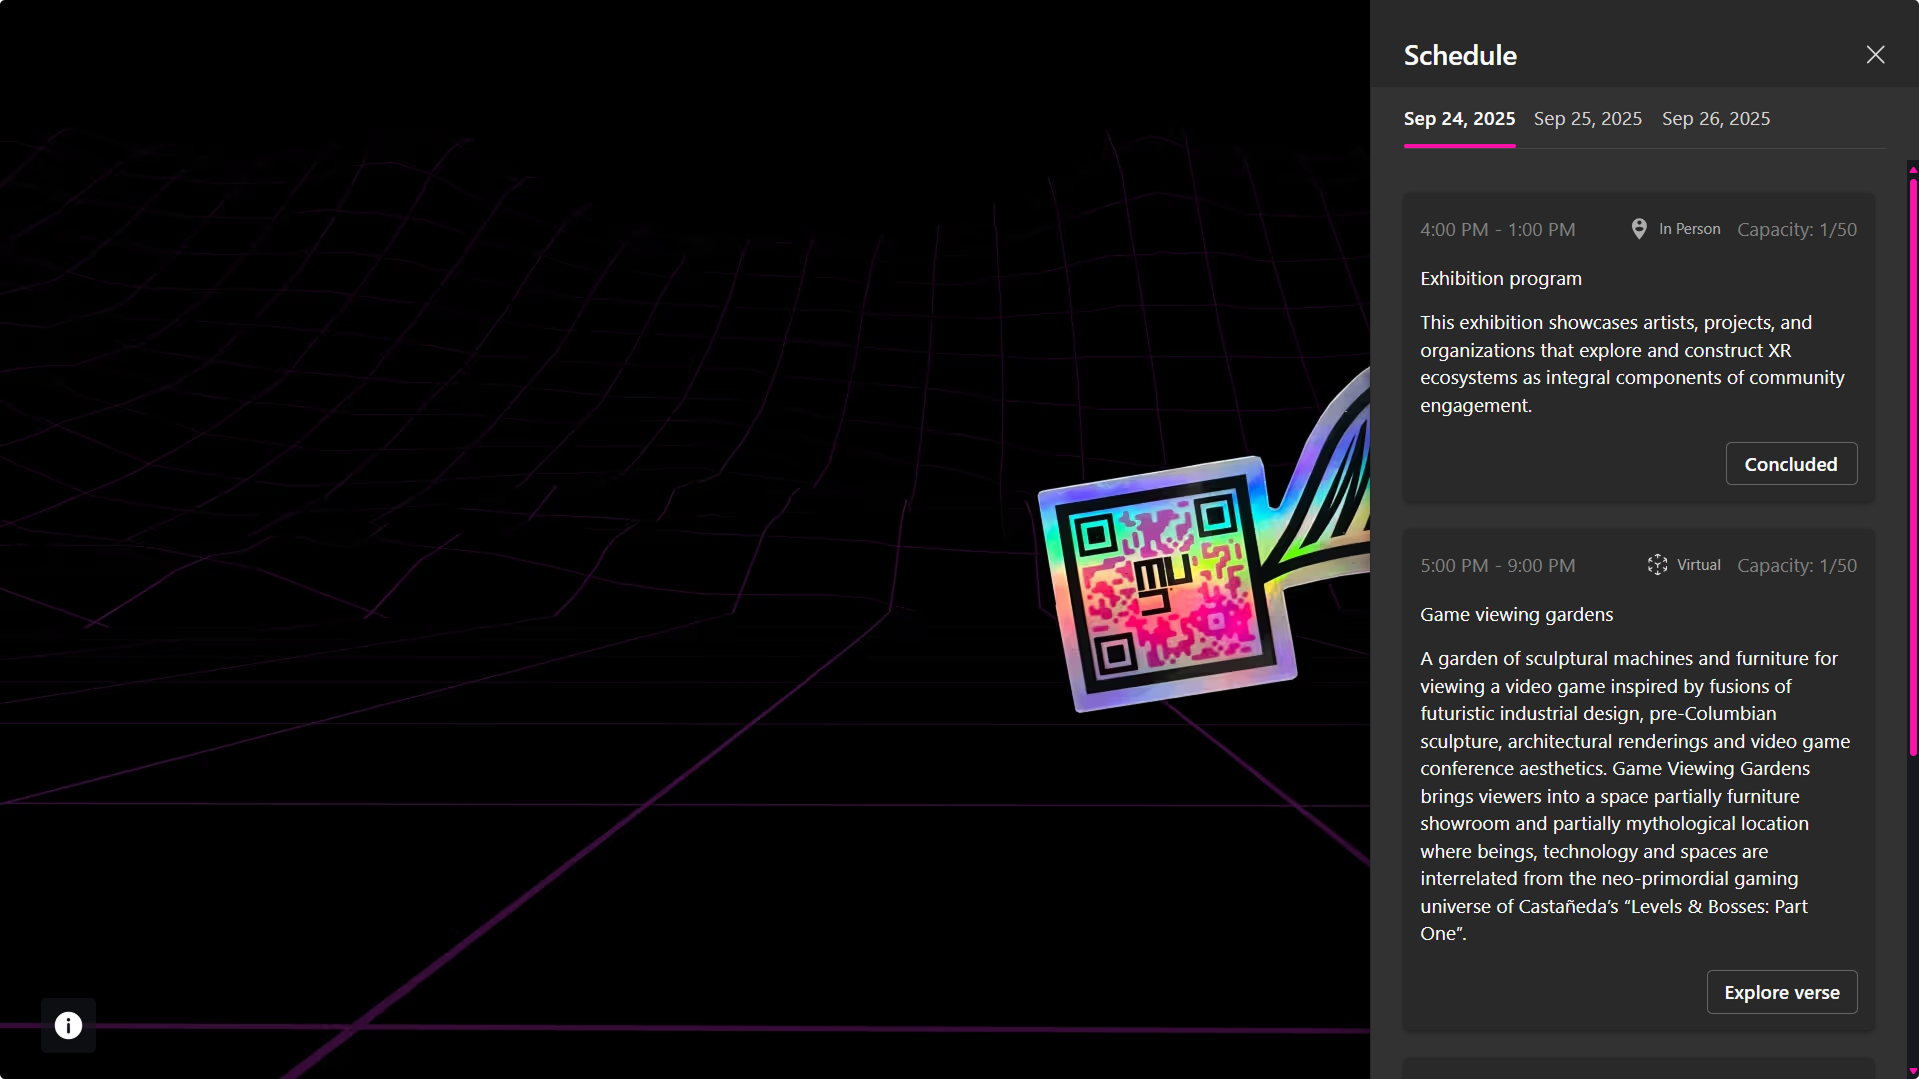
Plan the activation flow:
- Presenters: Add individuals who will lead sessions.
- Presentations: Create and assign sessions.
- Timeline: Automatically organizes sessions by date.
Presenters can be added with profile images, names, and emails. Use filters to sort and assign them to presentations.
Presentations
To create a session within your activation, select + Add Presentation and complete the following fields:
- Upload Media: Add a banner image or video (maximum file size: 5 MB) to visually represent the session.
- Name: Title of the presentation or activity.
- Description: Brief summary of the session’s content.
- Capacity: Maximum number of attendees permitted.
- Start/End Date & Time: Define the session’s duration.
- Presenters: Assign one or more presenters from your existing list.
- Virtual Location: Choose a Verse (a published XRHUB virtual environment) or add a custom URL (e.g., Zoom, Google Meet).
- Physical Address: Enter the real-world location with
- Country, State/Province & City
- Street Address
- Location Name (e.g., Convention Center, Hall A)
- Postal Code
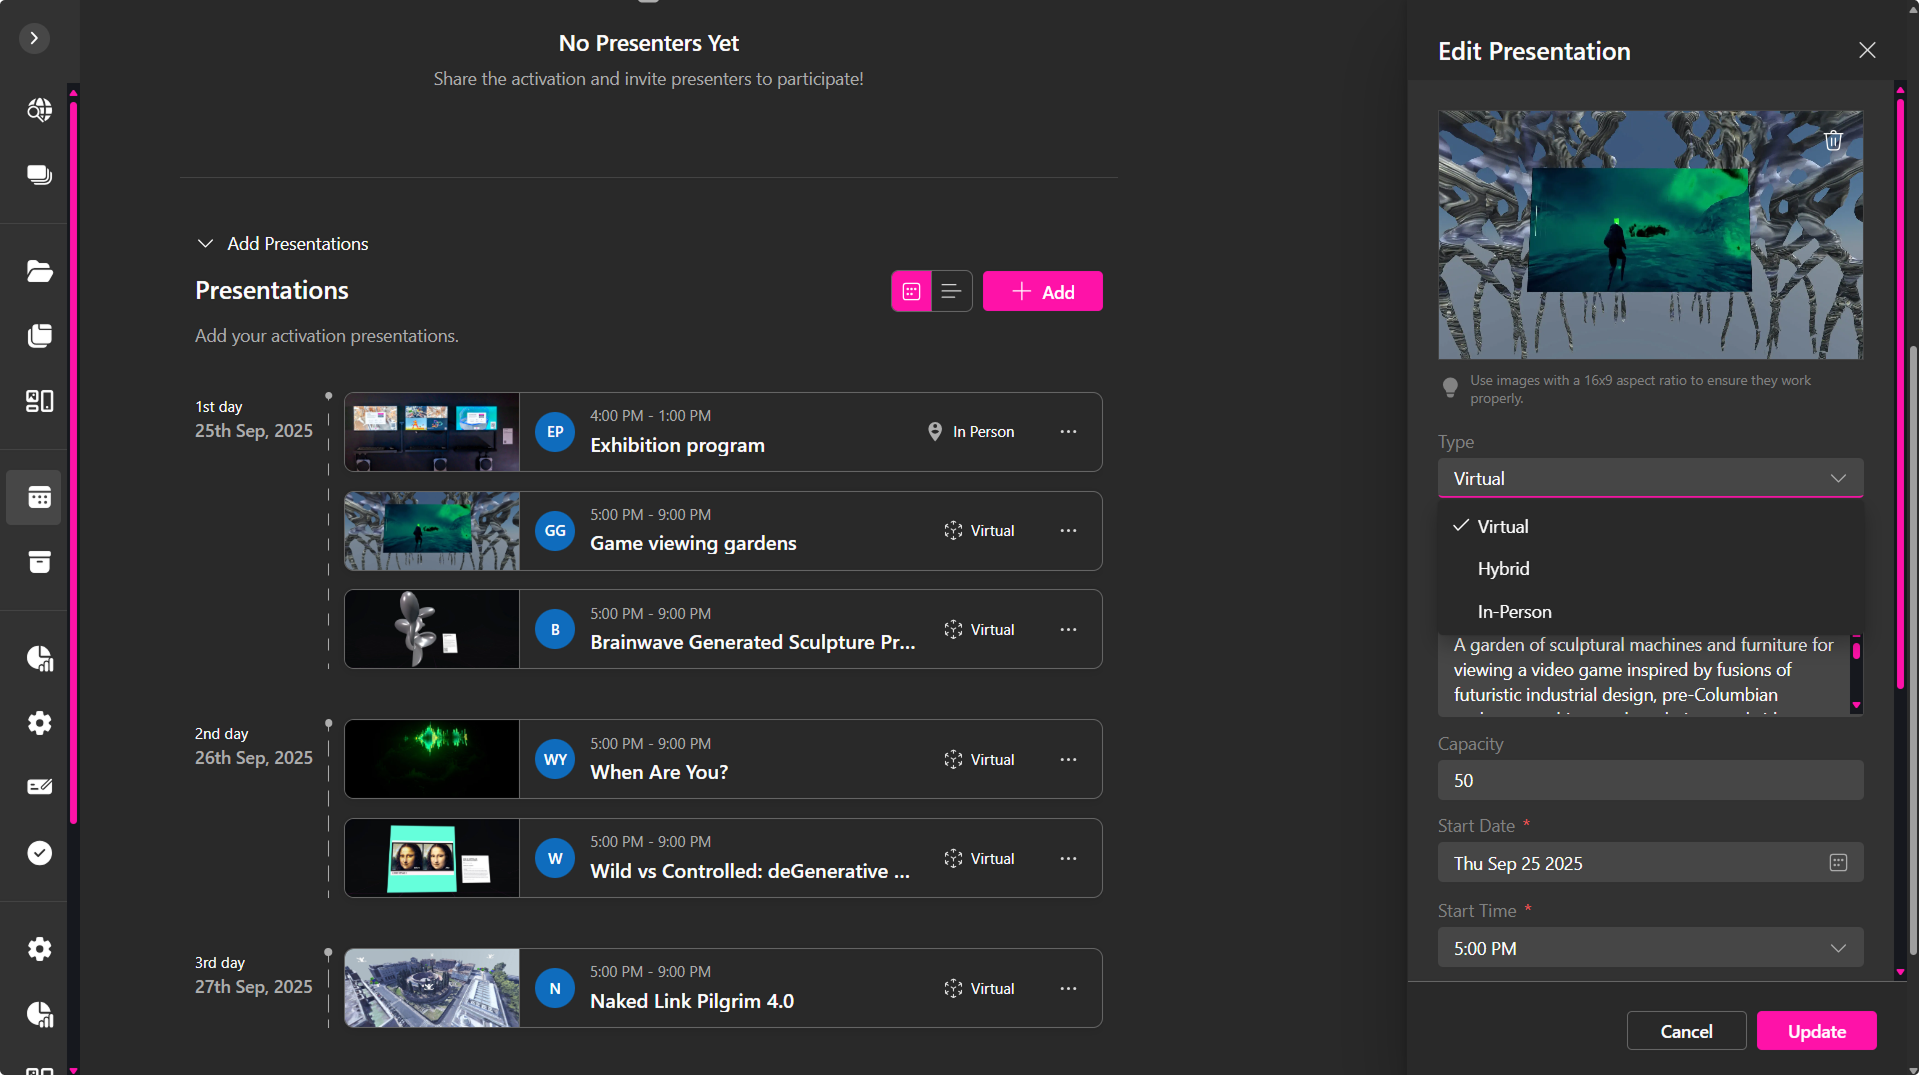
All added sessions appear in a timeline-style list, organized by day. Each entry displays the title, time, thumbnail, and assigned presenter(s). Use the action menu (…) on each presentation card to edit or delete sessions as needed.
🔹 Recommendation: For smoother flow and audience engagement, consider organizing your activation into distinct sessions if it includes multiple activities throughout the day (e.g., Opening Keynote, Workshop, Social Gathering).
Registration
The Registration tab allows you to manage attendance and, if applicable, configure ticketing options. By default, users may RSVP without tickets. However, for paid or access-controlled events, tickets can be added.

Activation Capacity
Capacity defines the maximum number of registrants. It is calculated as follows:
-
With Presentations: Total capacity is the sum of all individual presentation limits.
Example: Three sessions with capacities of 10, 15, and 20 result in a total activation capacity of 45. -
Without Presentations: Capacity can be manually set via the Edit option.
Tickets
Tickets are listed with their usage limits and pricing details. If your event requires payment, you can set the ticket price here, this will be connected to your organization's stripe account.
The first ticket created is automatically linked to the RSVP button on the activation page, making it the default option for attendees.
To create a ticket:
- Select + Add under the Tickets section.
- Complete the following fields:
- Ticket Name: Display label (e.g., General Admission, VIP Pass).
- Description: Additional details, perks, or access rules.
- Price & Currency: Define cost; set to 0 for free tickets.
- Sales Start/End: Schedule ticket availability.
- Discount Codes (optional): Add promotional pricing.
- Click Create Ticket to save.
You can manage tickets, edit or remove them, by using the action menu.
🔹Recommendation: Use multiple ticket types to accommodate different participation levels (e.g., Free Registration, VIP Access).
Notifications
The Notifications tab enables automated email communication with guests before, during, and after the activation. Each notification can be toggled on/off, previewed, and customized.
Email Types
- RSVP Invitation: Sent when a guest is invited; includes activation details and an RSVP button to confirm attendance.
- RSVP Confirmation: Sent after a guest responds; provides access information and activation details.
- Session Registration Confirmation: Sent when a guest registers for a specific session within the activation.
- Activation Reminders: Sent to registered participants ahead of the activation to ensure timely attendance.
- Post-Activation Feedback Request: Sent after the activation concludes to gather participant ratings and comments.
Each email can be customized for content. A preview option is available, and test emails can be sent before activation.
🔹 Recommendation: Keep messages concise and aligned with your activation identity to improve engagement and avoid spam filters.
Embed
The Embed tab allows you to promote your activation externally by embedding it into websites or content management systems.

Embed Options
- HTML Code Snippet: Copy and paste the provided
<iframe>code. - Custom Sizing: Adjust width and height attributes.
- Styling: Default includes border and rounded corners; additional styling via CSS.
- Fullscreen Option: Enable
allowfullscreenfor expanded view.
In this tab, you can alo see a live preview displays how the embedded card will appear, including:
- Activation title, date, and time
- Privacy status
- Activation type
- Host details and description
Visitors may click View Full Activation Page to access the complete activation landing page.
🔹 Recommendation: Embed your activation on partner sites, blogs, or organizational pages to increase visibility and drive RSVPs.
Analytics
The Analytics tab provides insights into audience engagement across the activation and individual presentations.
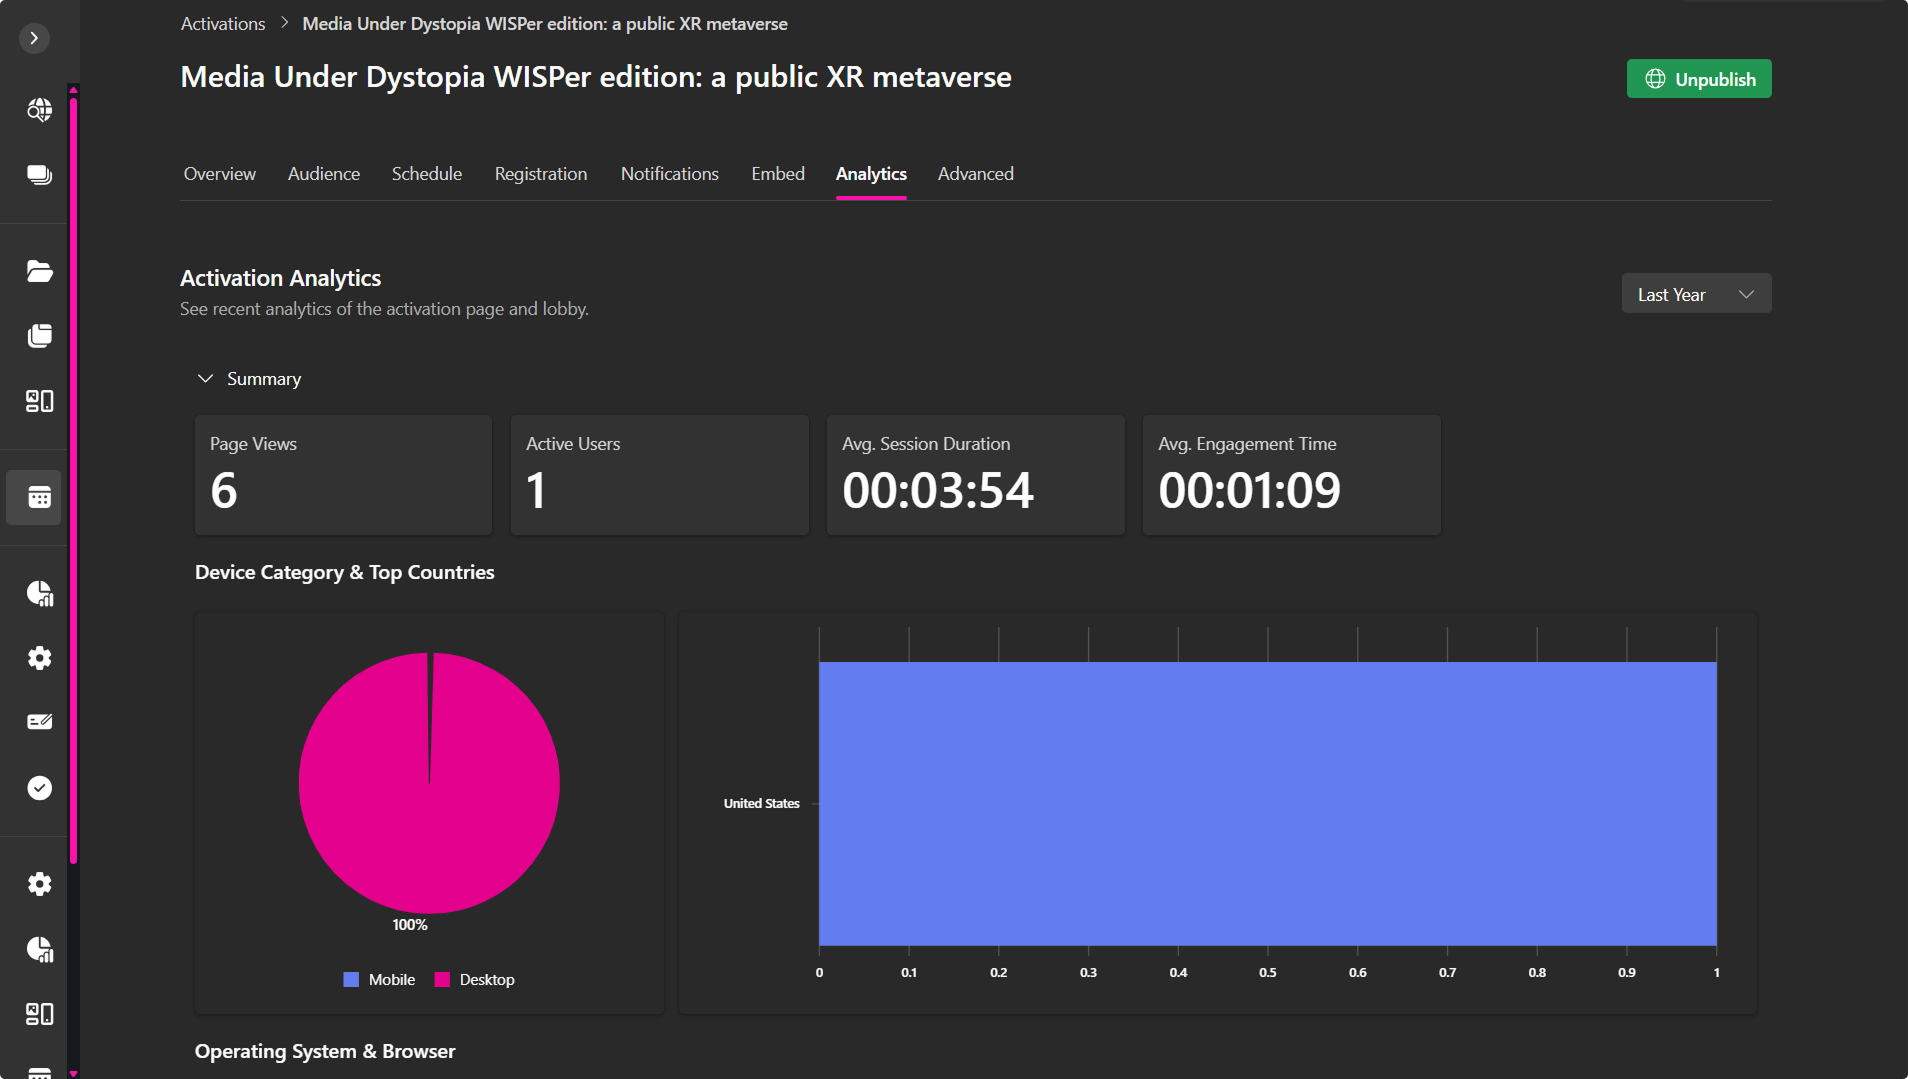
Time Range
Analytics can be filtered by time period (e.g., Last 7 Days, Last 30 Days).
Event-Level Metrics
- Page Views: Total visits to the activation page
- Active Users: Unique participants
- Avg. Session Duration: Time spent per visit
- Avg. Engagement Time: Time spent actively interacting
- Device Category & Countries: Breakdown by device and geography
- Operating System & Browser: Platform usage
- Traffic Sources & Events: Referral paths and key interactions
Presentation-Level Metrics
Same metrics as above, focused on each session. Includes device, location, and engagement breakdowns.
Recommendation: Use comparative data to refine future agendas and optimize platform compatibility.
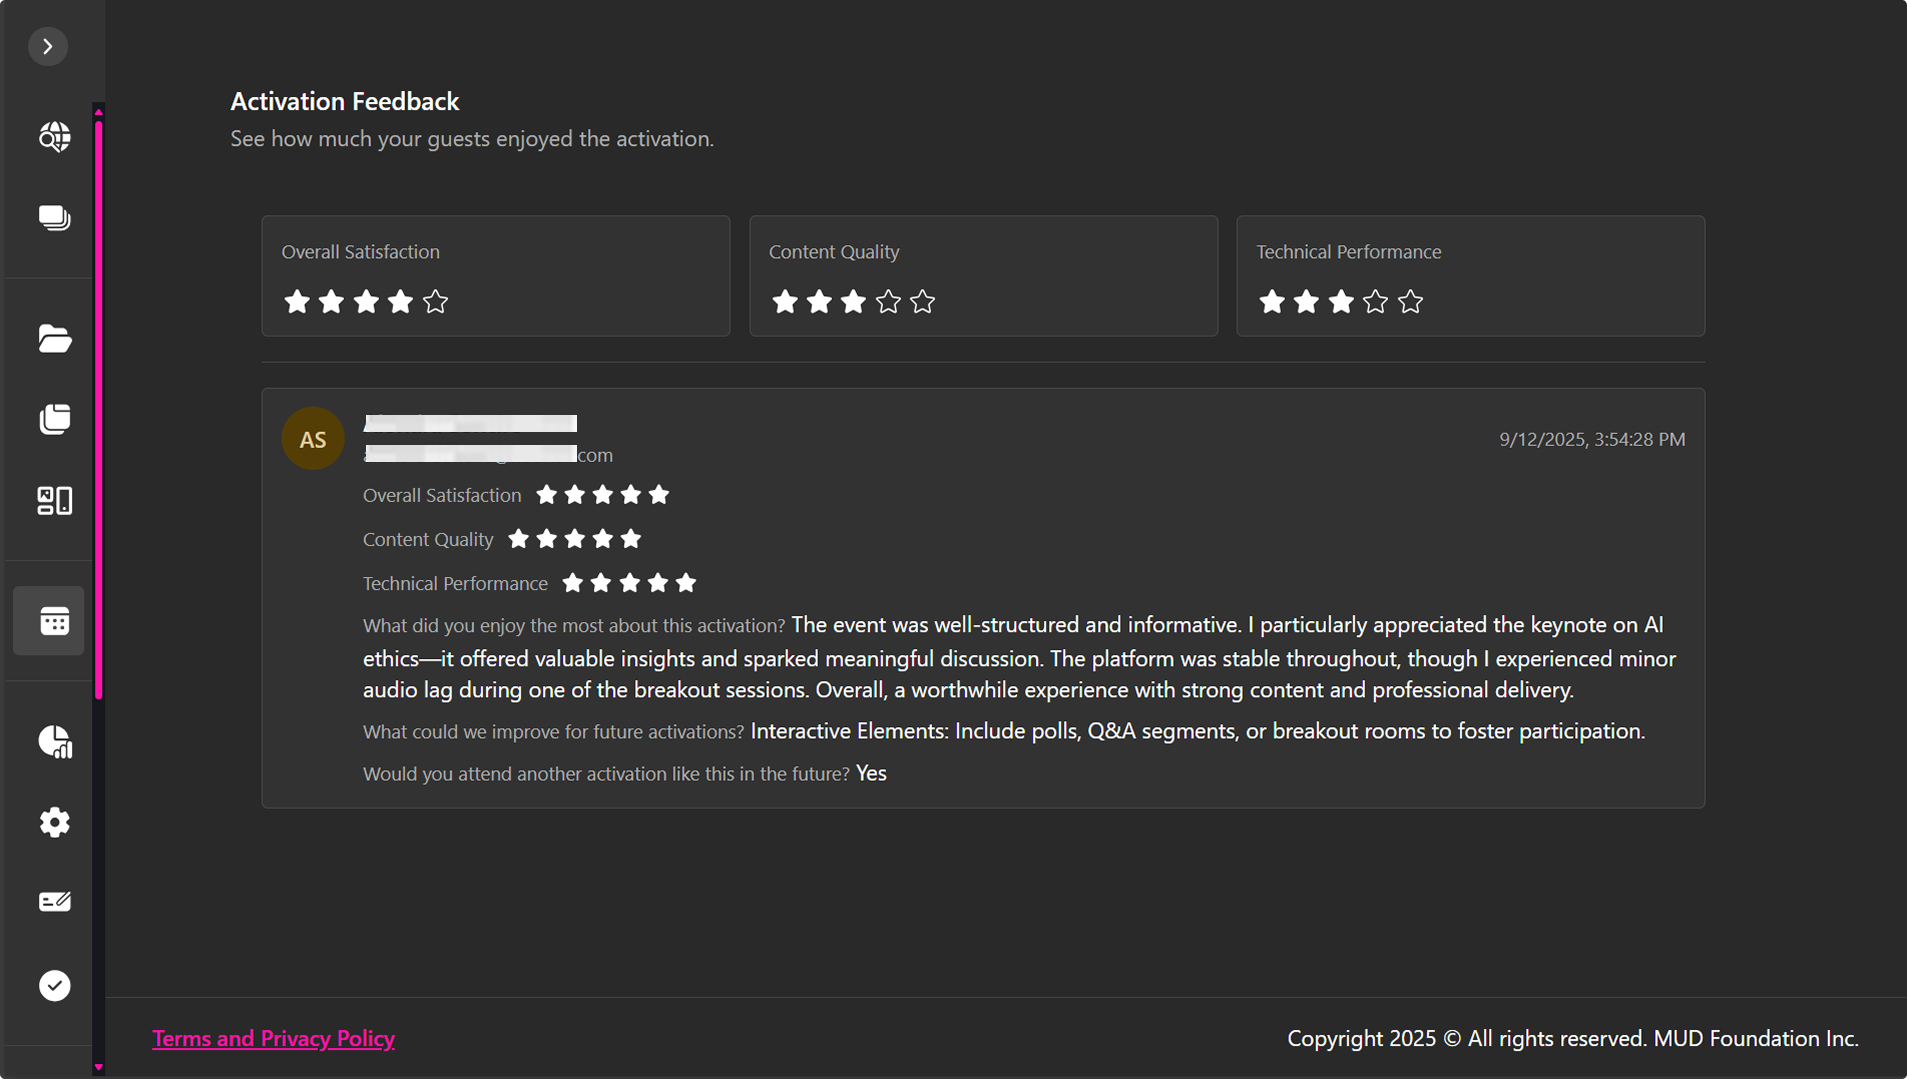
Activation Feedback
Collected via the Post-Activation Feedback Email. Displays ratings and comments submitted by attendees.
Advanced
The Advanced tab includes options to duplicate or cancel your activation.
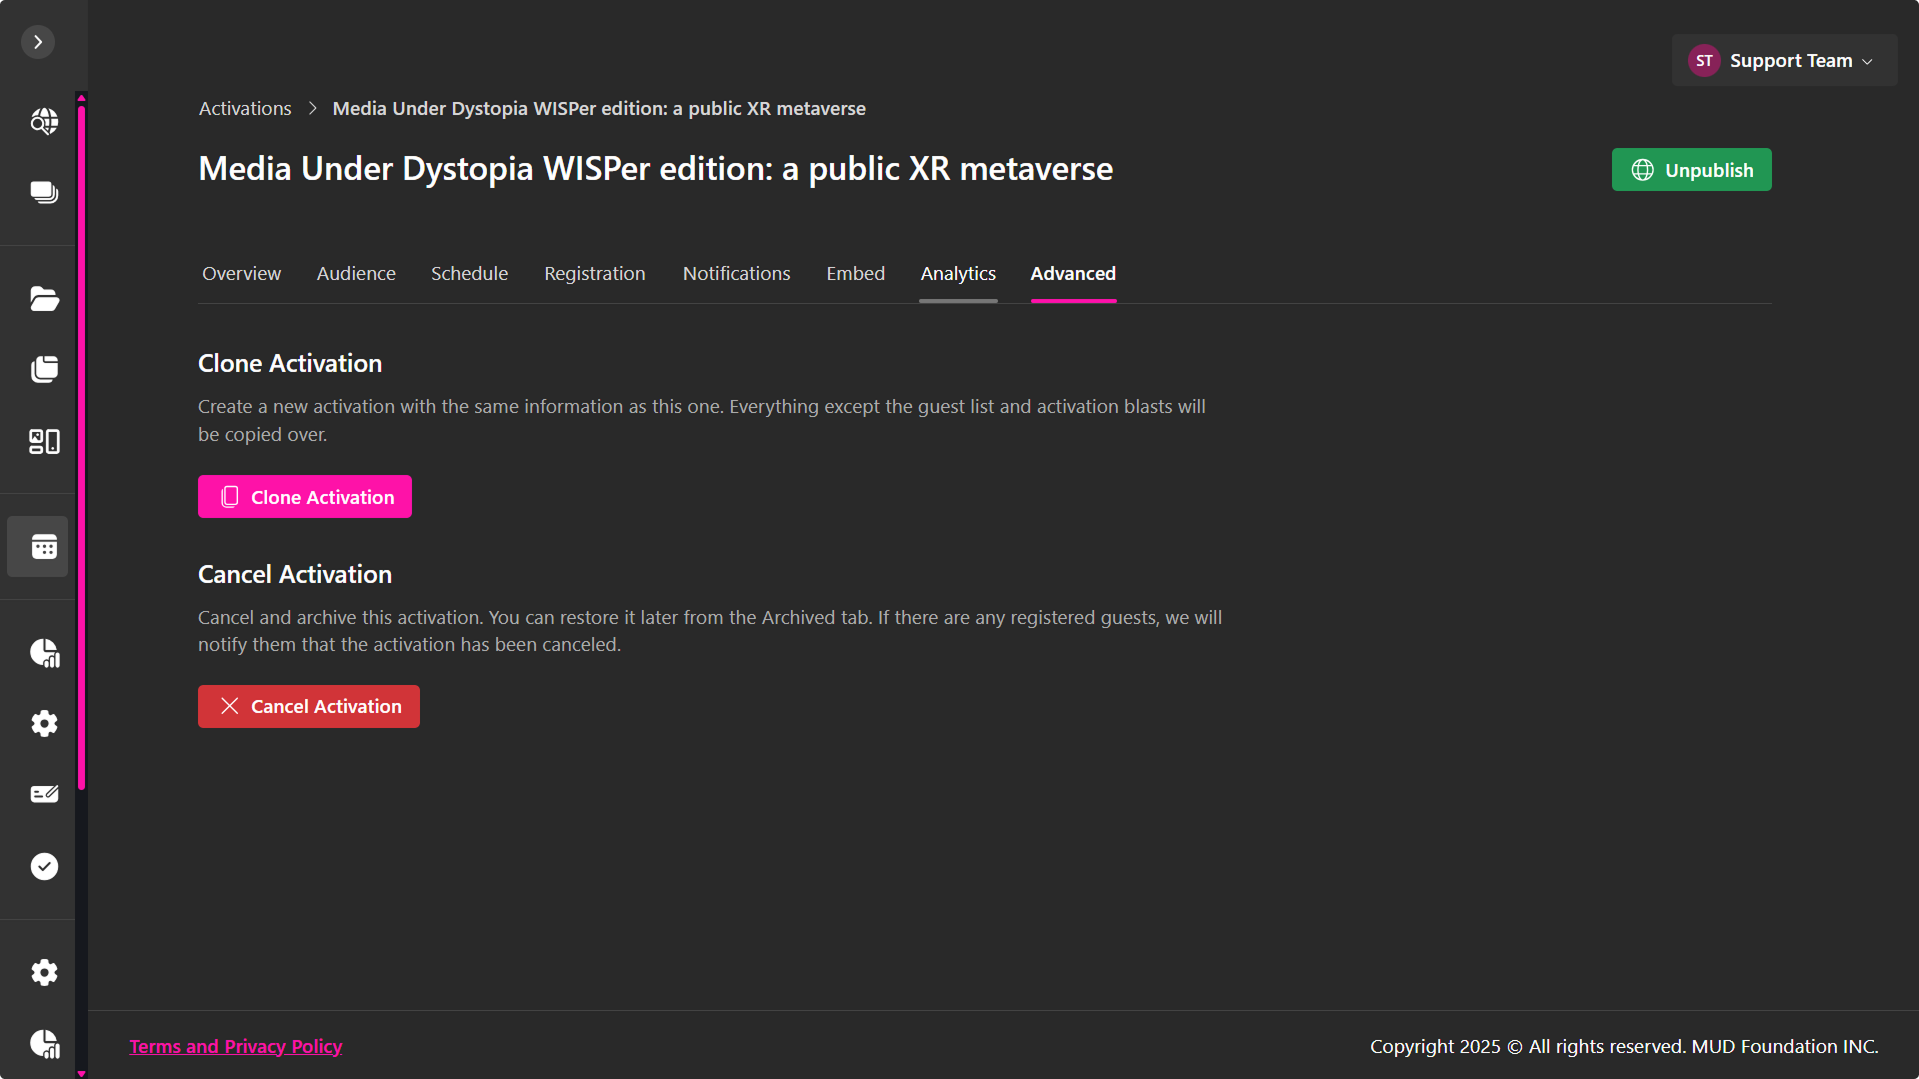
Clone Event
- Purpose: Create a new activation using the same configuration.
- Copied: Activation details, schedule, and settings
- Not Copied: Guest list and notifications
- Use Case: Ideal for recurring formats or streamlined setup.
Cancel Event
- Purpose: Archive the activation and notify registered guests.
- Effect: Activation is moved to the Archived tab.
- Use Case: Suitable for postponed or discontinued events.
🔹 Recommendation: Use cloning for efficiency; cancel only when necessary to preserve records and inform participants.
RSVP and activation Booking
After managing your activation, you can publish it and access its landing page either from the Overview tab within the management page or by clicking its card on the Activations page.
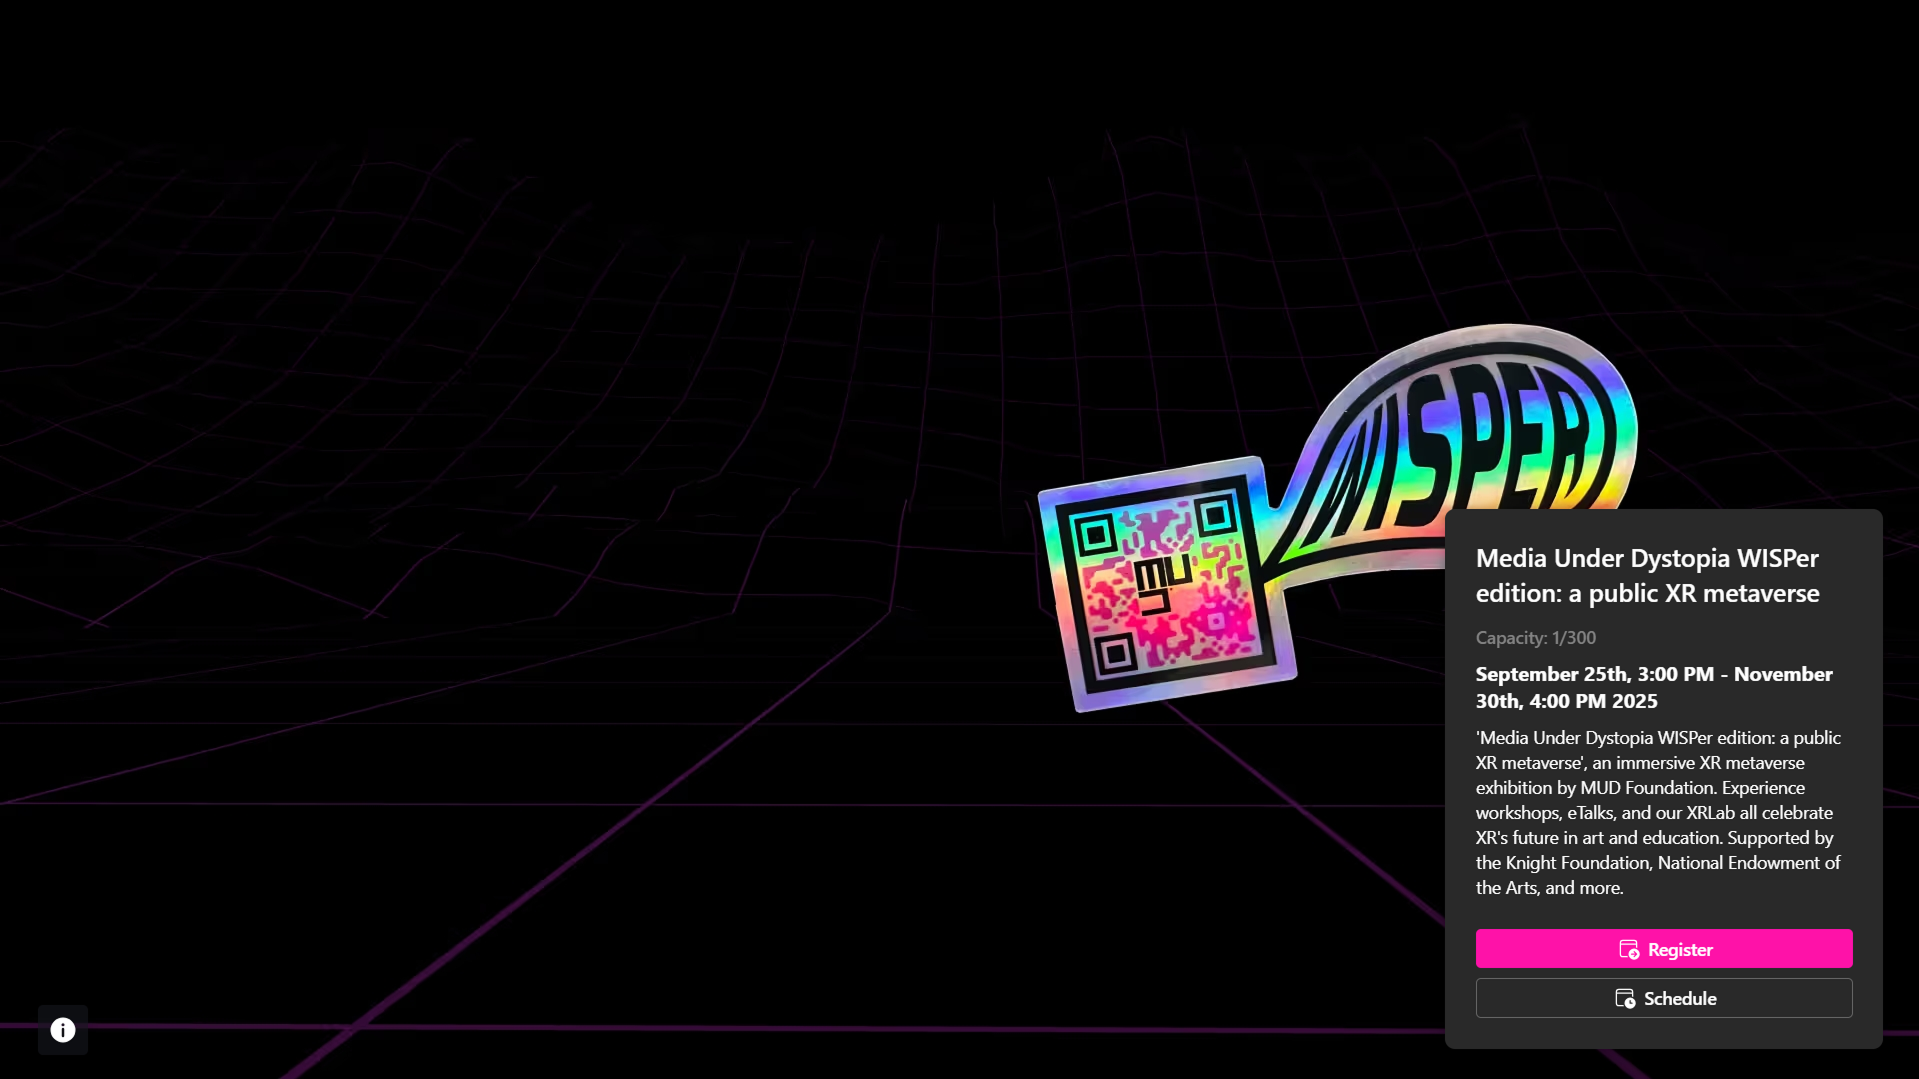
All activations, whether Virtual, In-Person, or Hybrid, require RSVP. This ensures accurate participant registration and enables organizers to manage attendance effectively.
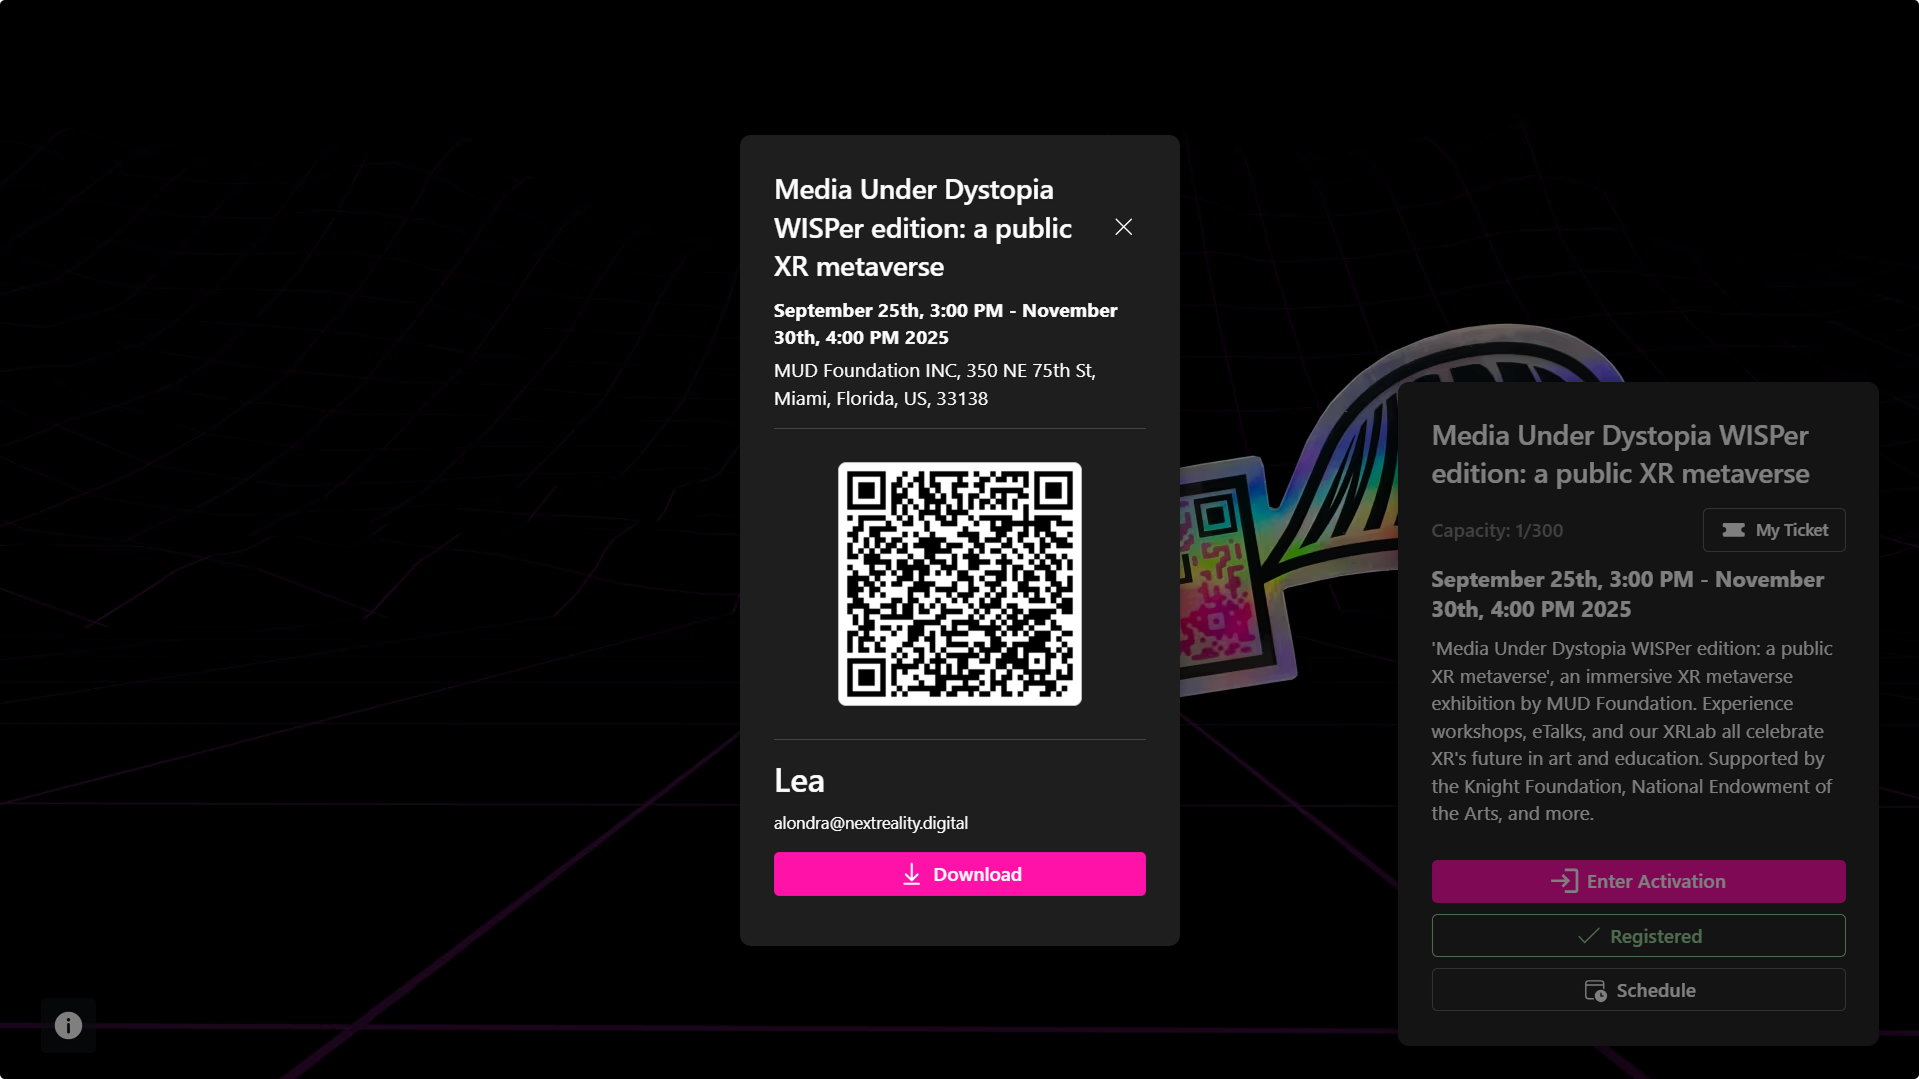
RSVP Without Presentations
For activations consisting of a single main session (without individual sessions):
For In-Person Events, RSVP generates a digital ticket with a QR code, which must be scanned at the venue to confirm entry.
RSVP With Presentations
For activations that include scheduled presentations:
- Guests must select the specific sessions they wish to attend during the RSVP process.
- Once confirmed, their RSVP is locked to those selections.
- To join additional sessions later, guests must book them individually via the Schedule sidebar.
Free vs. Paid Events
- Free Events → Guests must create an account to RSVP. This allows organizers to track attendance and engagement. Free registration is automatically enabled when no ticket is added during the registration setup.
- Paid Events → When guests click Get Ticket, they are redirected to Stripe to complete their purchase. Registration is confirmed upon successful payment. This option is configured by adding a ticket in the registration management settings.
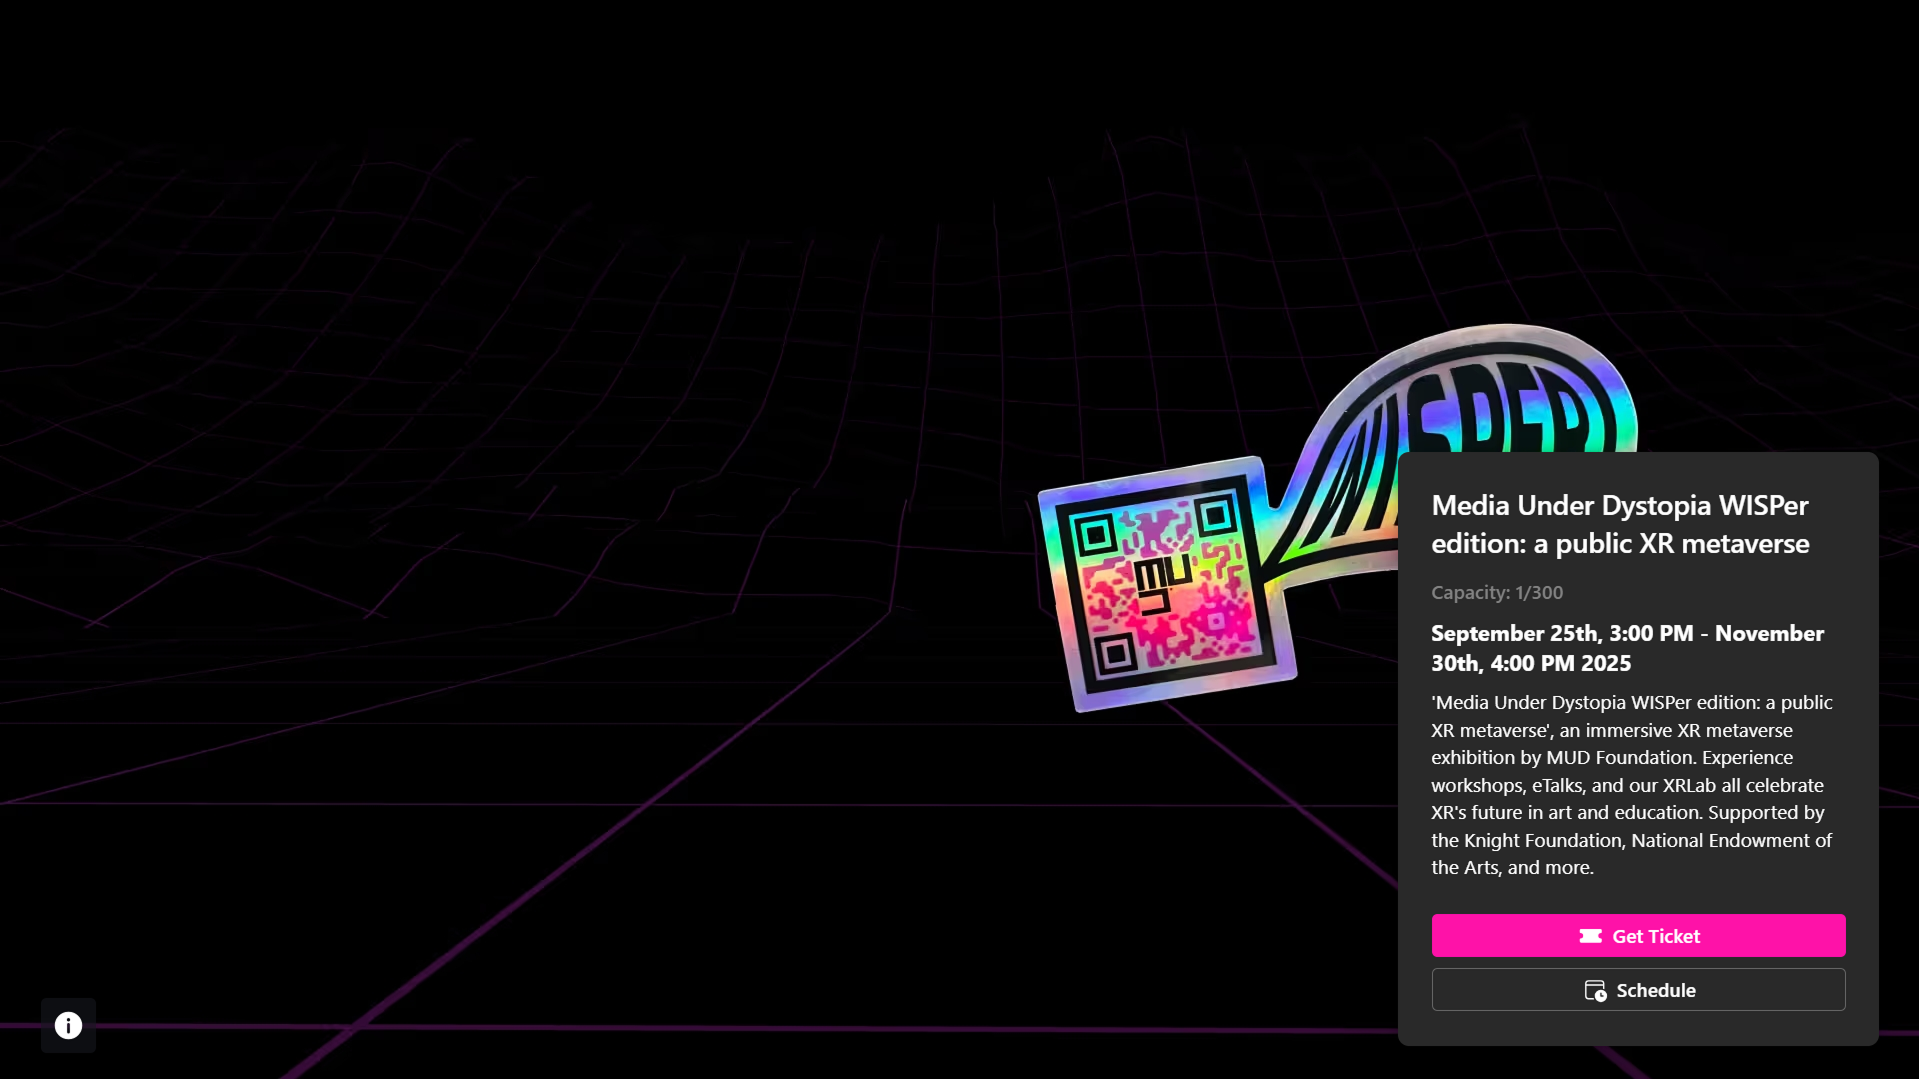
Email Confirmation
Upon successful RSVP or booking, guests receive a confirmation email containing:
- Activation details (date, time, format)
- Ticket (for in-person events) or access link (for virtual events)
- Calendar integration options (Google, Outlook)
This process ensures that access is granted exclusively through the official activation landing page, in accordance with the privacy settings defined by the organizer.