Working with 2D Elements
Adding media elements such as images, videos, audio, and PDFs enhances the visual appeal and interactivity of your Verses.
These elements serve as decorative assets, informational displays, or interactive portals — helping create immersive, story-driven experiences inside the Metaverse.
Uploading Media Assets
You can add media to your project in two ways — directly from the Assets tab in XR Creator Studio, or via the Archive in XRHUB for projects requiring metadata and broader platform availability.
Upload Method Overview
| Upload Method | Use Case |
|---|---|
| Assets Tab (in Resources Panel) | Best for quick uploads of media used directly within your current project. |
| Archive (in XRHUB Apps) | Recommended for uploading artworks, media, or 3D assets that include metadata and need to be accessible across all XRHUB environments. |
Uploading via the Assets Tab
- Open the Assets tab in XR Creator Studio.
- Click Add and upload your file from your computer.
- Drag and drop the file into the Viewport to place it in your scene.
- Configure its display and interaction options in the Properties Panel.
Supported Formats
- Images:
.png,.jpg,.gif - Videos:
.mp4 - Audio:
.mp3 - PDFs:
.pdf
Uploading via the Archive
For projects requiring detailed metadata, authorship information, or version tracking, you can upload assets through the Archive located under the Resources panel.
These assets will be accessible across the entire XRHUB platform.
When uploading, you can choose from three asset categories:
| Category | Purpose |
|---|---|
| File | For general media and 3D assets. |
| Digital Art | For original artistic works that include creative and legal metadata. |
| Digital Twin Art | For digital representations of physical artworks, including measurements and digitization details. |
Uploading a File
- Navigate to Apps → Archive in the XRHUB sidebar.
- Click + Upload in the top-right corner.
- Select File from the upload type menu.
- Drag and drop your file, or click to browse.
- Fill in the required fields:
- Title*
- Description
- Click Upload to complete.
Supported File Types: GLB, PNG, JPG, GIF, PDF, MP4, MP3
Maximum File Size: 50 MB
Tip: Use descriptive titles and tags to improve asset discoverability.
Uploading Digital Art
Designed for artworks that include creative, author, and ownership information.
- Click + Upload → Digital Art.
- Drag & drop your media file or add a URL.
- Under Work Information, fill in:
- Title*
- Description
- Date of Creation*
- In Artist Information, add:
- Artist Name*
- Bio (brief biography)
- Artist Statement (vision or artistic intent)
- Under Legal and Rights Information, specify:
- Declaration of originality
- Optional AI creation indication
- Acceptance of terms and conditions
- Click Upload to finalize.
Note: Metadata is embedded and remains accessible when viewing or sharing the artwork in AR or within the Metaverse.
Uploading Digital Twin Art
Built for documenting physical artworks as 3D digital twins, including size and digitization data.
- Click + Upload → Digital Twin Art.
- Drag & drop your model or select it from your files.
- Complete Work Information:
- Title*
- Description
- Date*
- Dimensions (Height, Width, Depth — cm or in)
- Digitization Technique (e.g., photogrammetry, LiDAR, 2D scanning)
- Current State (e.g., on display, in restoration)
- Add Artist Information:
- Name
- Bio
- Artist Statement
- Under Legal and Rights Information, fill in:
- Declaration of originality
- Optional AI creation indication
- Terms acceptance
- Click Upload to complete.
Recommendation: Use this type for physical installations, sculptures, or mixed-media works that exist both digitally and physically.
Adding Images to Your Scene
Images can be displayed in your Verse using two projection modes:
- 2D Projection — Displays flat images in the 3D space.
- 360° Equirectangular Projection — Wraps the image around the scene for immersive backgrounds or skyboxes.
How to Add Images
- Upload an image via the Assets tab or Archive.
- Drag & drop it into the Viewport.
- Configure projection type and behavior in the Properties Panel.
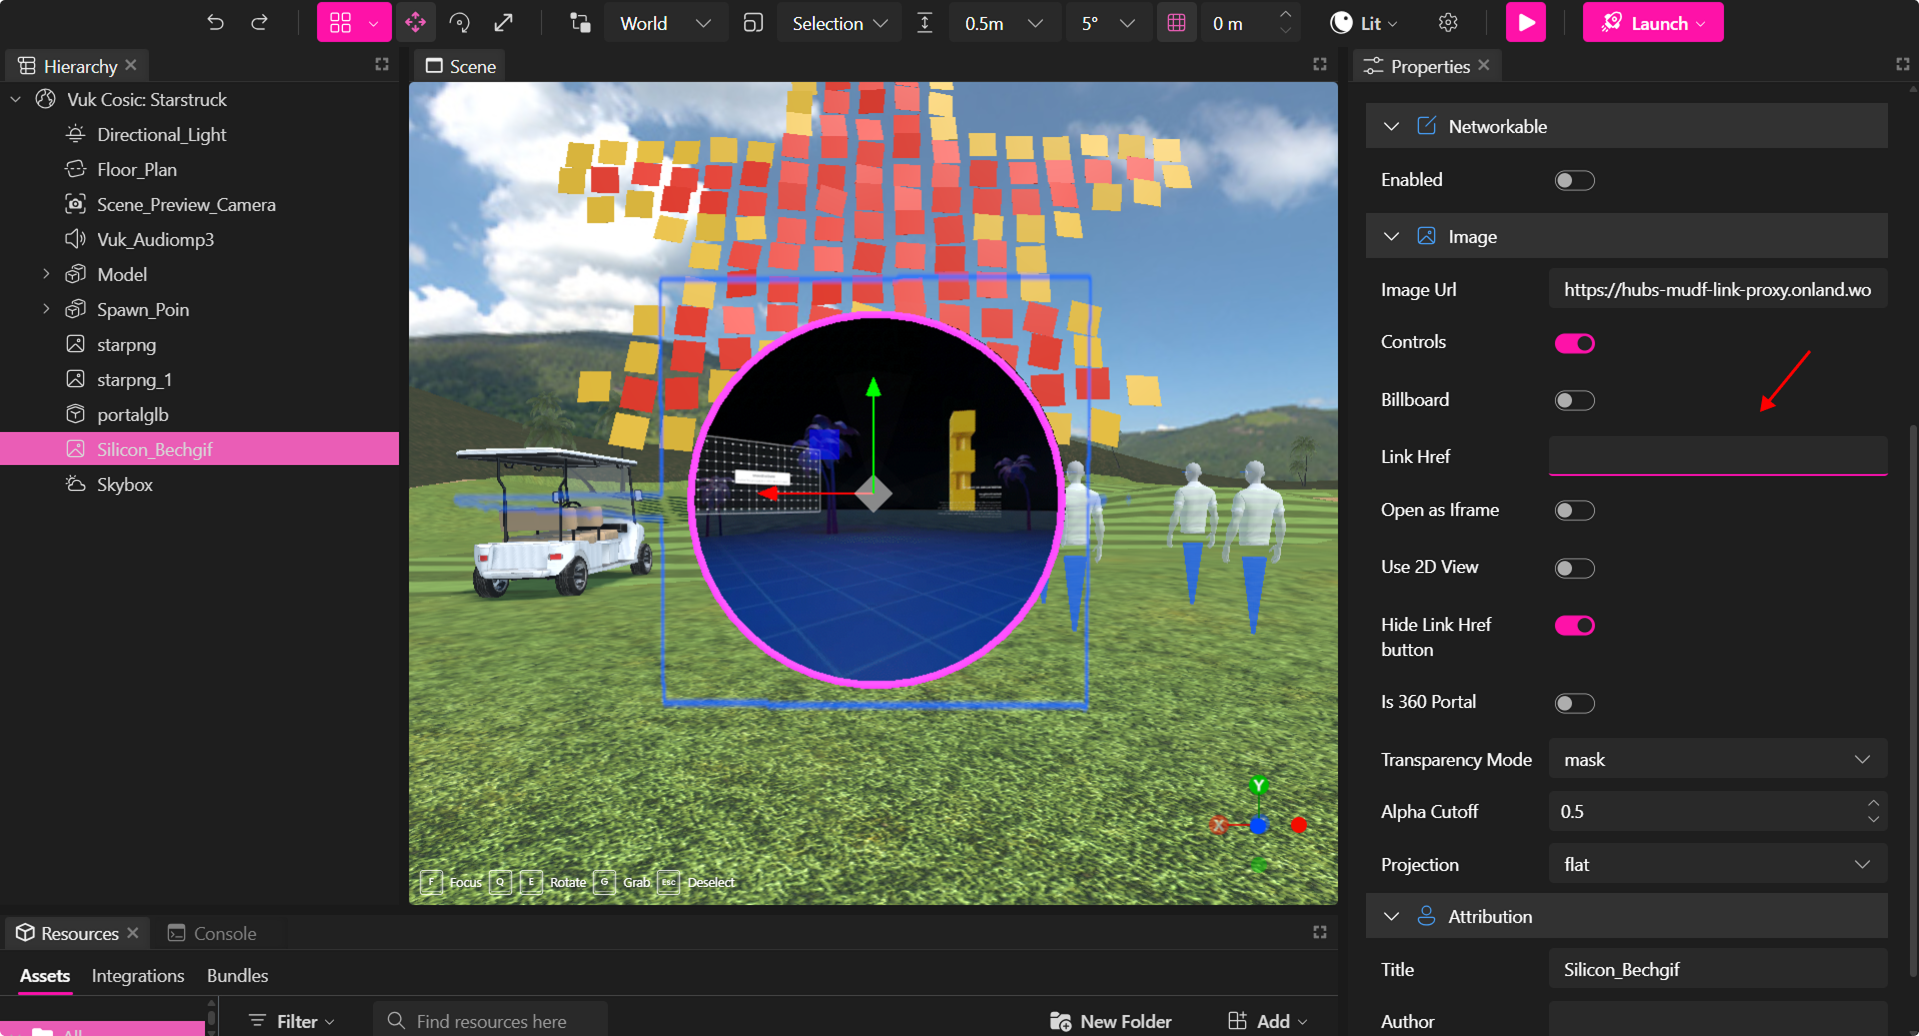
Image Properties
| Property | Description |
|---|---|
| Image URL | Defines the source URL of the image. You can use it to upload/change an image or provide an external link. |
| Controls | Toggles interaction controls for the image, such as zoom or other display options. |
| Billboard | Forces the image to always face the user, making it useful for UI elements or signs. |
| Link Href | Allows the image to act as a hyperlink, directing users to external URLs, Metaverse rooms, or other Verses. |
| Open as Iframe | Enables the image to open as an iframe instead of redirecting users to another page. |
| Use 2D View | Displays the image in a 2D viewing interface, allowing zoom and pan functionalities. |
| Hide Link Href Button | Removes the interactive "Jump" button for linked images, making transitions seamless. |
| Is 360 Portal | Converts the image into a 360-degree immersive portal when enabled. |
| Transparency Mode | Adjusts the transparency settings (e.g., opaque, transparent). |
| Projection | Controls how the image is projected: flat (standard 2D) or equirectangular (360-degree wraparound). |
Attribution Properties
If the image is an artwork or licensed content, you can provide attribution details.
| Property | Description |
|---|---|
| Title | Sets the name of the image or artwork. |
| Author | Displays the creator's name for proper attribution. |
| URL | Provides a link to the original source or additional details. |
Using an Image as a Portal
You can use images or videos as portals to link to external rooms, scenes, or websites. This feature is perfect for creating transitions between Verses or providing direct access to web-based content.
to Set Up a Media Portal
- Upload an image or video to your project.
- Position it in the viewport where users can interact with it.
- In the Properties Panel, find the "Link Href" field.
- Input the URL for the target Metaverse room, scene, or external link.
- Publish your project.
- Once published, hovering over the image will display a "Jump" option.
🔹 Pro Tip: You can hide the "Jump" button by enabling the "Hide Link Href Button" option in the Properties Panel, providing a seamless transition effect.
Adding Videos to Your Scene
Videos can be uploaded and used as permanent media players in your Verses. XR Creator supports both static video files and live streaming content.
How to Upload and Configure Videos
-
Open the "Assets" tab and upload a video file or link to a streaming source.
-
Set the playback options in the Properties Panel, including:
- Auto Play: Start video automatically upon scene entry.
- Loop: Enable continuous playback, ideal for background videos.
- Enable Video by Proximity: Start playing when users approach within a defined radius.
-
Set the Video Controls: Toggle the controls switch to enable interactive features for the video player.
You can activate any of the following options.- Volume control
- Full-screen mode
- Play/Pause button
- Seek buttons (Next/Previous)
- Time display
-
Video as a Portal: Add a video element, then set the "Link Href" to make the video function as a portal, similar to images.
Additional Video Properties
| Property | Description |
|---|---|
| Billboard | Ensures the video always faces the user, ideal for UI elements or signage. |
| Invisible Background | Transforms a chroma color (e.g., blue/green screen) into transparency. |
| Start Video Inside Scene | Delays video playback until users enter the main room, avoiding pre-play in the lobby. |
| Use 2D View | Allows videos to open in a 2D interface with zoom and pan capabilities. |
| Projection | Choose between flat projection or 360-degree equirectangular projection. |
| Override Audio Settings | Customize audio behavior, including spatial audio effects. |
| Enable Proximity | Makes the video start when users approach within a specific range. |
Transparency for Videos
You can integrate transparent videos into Metaverse scenes, unlocking a new level of realism.
How to Enable Video Transparency
- Use a video with a chroma background (blue/green screen).
- Import the video into XR Creator Studio.
- In the Properties Panel, activate "Invisible Background".
- Publish the project—the background will be removed, creating a seamless transparent effect.
Audio
Audio enhances ambiance, provides narration, or triggers sound effects in Verses.
You can upload .mp3 files or link to external audio sources.
How to Add Audio
- Add an audio element via the Assets Panel.
- Upload an audio file or input an audio stream URL.
- Configure audio playback settings:
- Auto Play: Start audio automatically upon scene entry.
- Loop: Enable continuous audio playback.
Other Audio Properties
| Property | Description |
|---|---|
| Controls | Show or hide audio controls (e.g., play, pause, volume). |
| Don't Play Audio Twice | Prevent audio from repeating if the scene is reloaded (24-hour reset). |
| Start Audio Only Inside Scene | Ensures audio starts only within the main room, avoiding lobby playback. |
| Override Audio Settings | Use PannerNode audio for spatial sound effects. |
| Enable Proximity | Makes audio start when users approach within a defined radius. |
PDFs
PDFs can be displayed as interactive 3D elements, allowing users to view documents within the Metaverse.
How to Upload PDFs
- Upload a PDF file or link via a URL in the Assets Panel.
- Position the PDF in the scene as a 3D element.
- Use the "Use 2D View" option to enable easy navigation of PDF content.
🔹 Pro Tip: The 2D View is particularly useful for long documents, enabling scrolling and zooming.
Enabling 2D View
To enhance your viewing experience, you can select the "Use 2D View" option in the Properties Panel.
This allows you to view PDFs as 2D elements in the Metaverse, making it easier to scroll and read content comfortably.
By mastering 2D elements, you can create engaging and interactive experiences in XR Creator Studio, bringing your Metaverse visions to life! 🚀