User Interface
The XR Editor provides a flexible user interface that you can tailor to match your personal preferences, making it easier to work in the editor. We offer predefined layouts and panel options to adapt your UI.
Toolbar

Dropdown Menus
The first row of dropdown menus provide a variety of options for managing your project.
- Project: This includes options to save, export, and publish your project.
- Home: Takes you back to the XR Editor main page, where all your projects are displayed.
Save Project: Use this option to store the current changes in your project without publishing.
Publish: This creates a unique Verse for your project, complete with a unique URL that enables you to create portals.
Import Project: This allows you to import a .mud file containing a pre-existing scene and all its assets.
Export Project: This creates a .mud file that can be imported into another XR Creator Studio account. It’s useful for saving old versions of projects or sharing a project with someone else.
- Edit: this dropdown option allows you to undo or redo changes in the projects.
Undo: reverse changes in the projects.
Redo: redo changes in the project.
- Select: select elements in the viewport.
Select all objects: select all objects in the viewport.
Duplicate selection: duplicates all objects that can be duplicated in a scene.
Focus selection: gets closer/focuses the view in the viewport in the selected object.
View: Use this dropdown to open closed panels like the properties, assets, console, and hierarchy panels or to change the layout of the editor to our predefined ones. Also to view on full-mode.
Run: Runs play mode or check the status of your scene.
Start preview: Runs your script or view the scene in the viewport as it would look in the metaverse. This is crucial for testing the custom code.
Health check: Runs the performance of your project/scene, allows you to see how your scene will perform once published in the metaverse.
- Help: This provides access to help documents and information.
Tutorial: This interactive tutorial guides you through the basics of the editor.
Keyboard and Mouse Control: This provides information on how the controls work in the editor.
Get Support: Use this to reach out to our team if you have any issues or questions about the editor.
Documentation: This links to detailed information about the XR editor.
Elements
Elements are the basic building blocks in the XR Editor. You'll find lights, media, colliders, and every other type of object here.
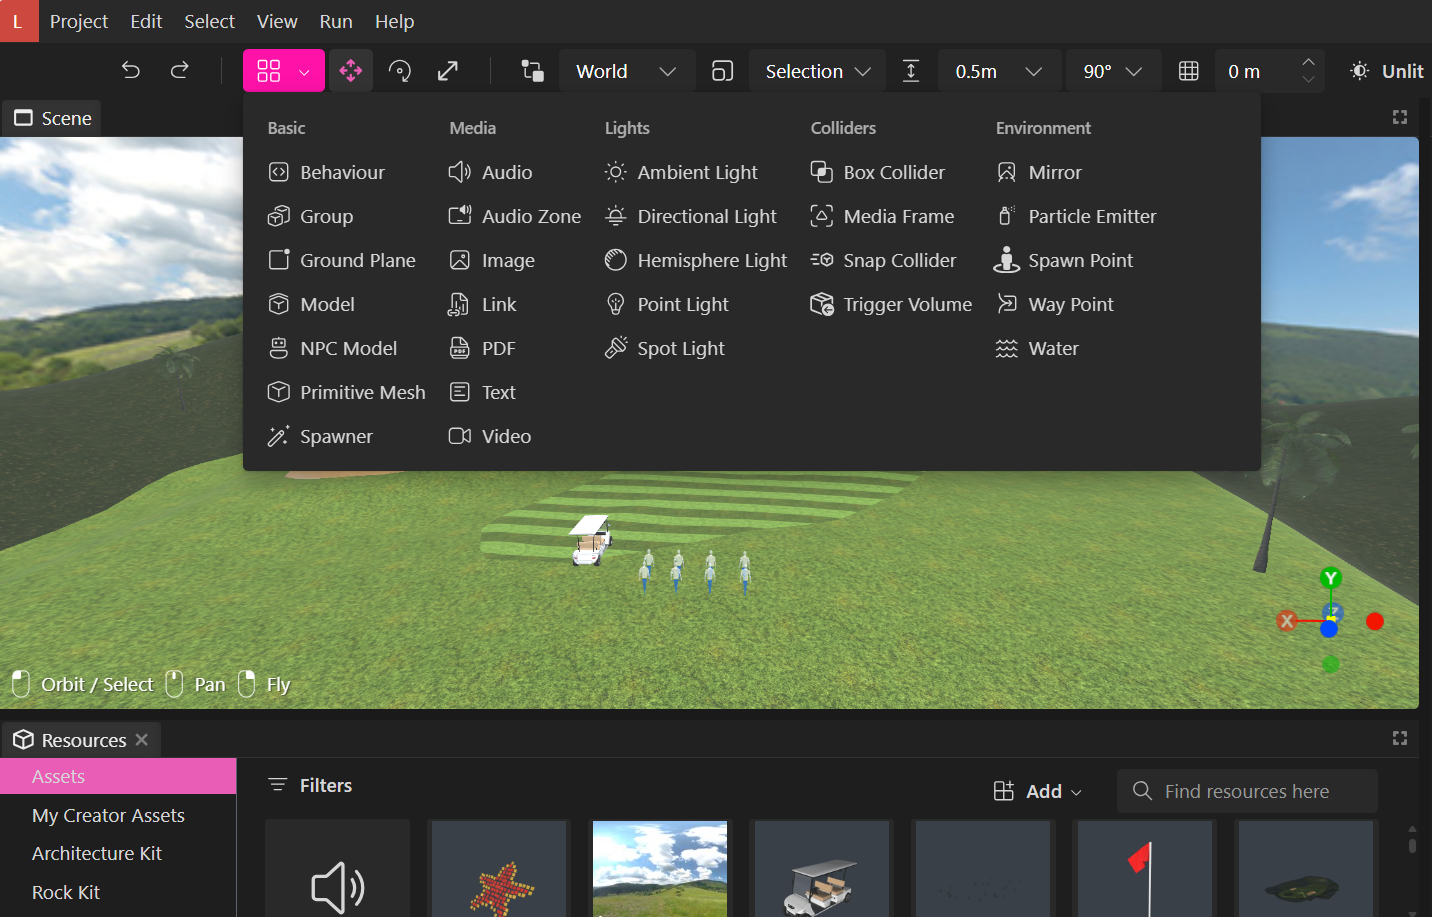
- Basic
Behaviour: Allows you to insert custom code in the editor to enhance the functionalities of project elements.
Group: Creates a group of objects that can be moved or duplicated together. Drag and drop objects into the Group element in the Hierarchy.
Ground Plane: Generates a flat ground plane that extends into the distance.
Model: Adds a 3D element to your project. You can change the URL to load a GLTF or file.
NPC Model: Adds a 3D model to your scene. You can change the URL to use it as an NPC model with additional properties.
Primitive Mesh: Adds a basic building block for constructing complex 3D objects.
Spawner: Creates an interactable model that other users can copy. You can change the URL to modify your spawner.
- Media
Audio: Allows you to dynamically load audio. Change the URL in the properties to load the audio.
Audio Zone: Defines a 3D area where audio parameters are overridden for contained audio sources.
Image: Allows you to dynamically load an image. Change the URL in the properties to load the image.
Link: Can be used to link to a room, scene, or website.
PDF: Allows you to dynamically load PDFs. Change the URL in the properties to load the PDF.
Text: Creates a 3D text element. You can change the default text in the properties panel.
Video: Allows you to dynamically load videos. Change the URL in the properties to load the video.
- Lights
Ambient Light: Adds a light that illuminates all objects in the viewport.
Directional Light: Adds a light that illuminates the entire scene but emits along a single direction.
Hemisphere Light: Adds a light that illuminates the scene from directly overhead.
Point Light: Adds a light that emits in all directions from a single point.
Spot Light: Adds a light that emits along a direction, illuminating objects within a cone.
- Colliders
Box Collider: Creates an invisible box that objects will bounce off of or rest on top of.
Media Frame: Adds a frame where people can position and capture media objects.
Nav Mesh: Sets a walkable surface area in your published project.
Snap Colliders: Adds an invisible layer where you can adhere objects when published. It is specially designed to adhere objects to walls.
Trigger Volume: Sets a property on the target object upon entering and leaving.
- Environment
Mirror: Renders a plane mirror that reflects other 3D objects.
Particle Emitter: Creates a particle emitter to emit particles in the scene.
Skybox: Creates a visualization of an open sky and atmosphere around your scene. You can change the settings to reflect the time of day.
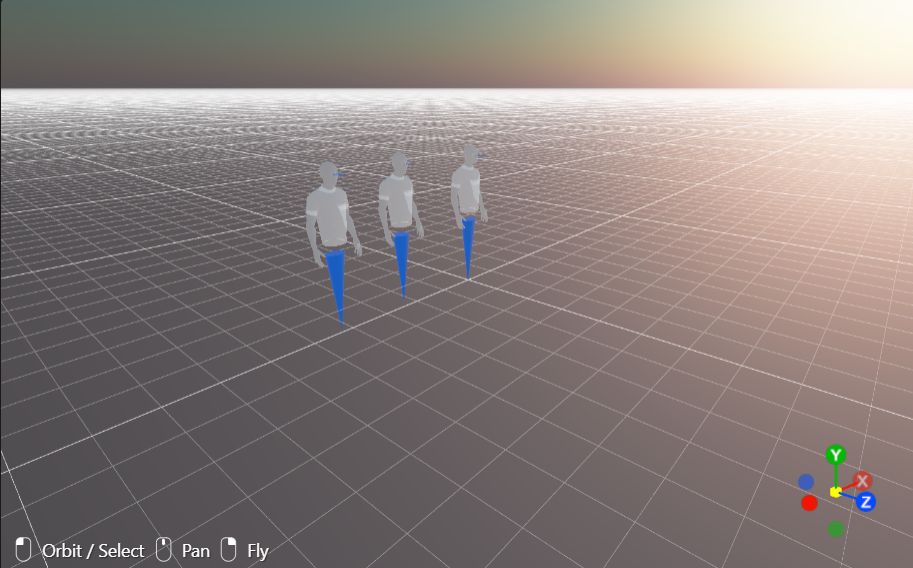
Spawn Point: A point where people will appear when they enter your scene. The icon in the viewport represents the actual size of an avatar.
Way Point: Creates a point where people can teleport to. If changed, it can work to teleport people to seats.
Water: Renders a water plane.
Transformation Tools

Translate [T]: Reveals the translation gizmo, drag the arrows to move object along the X, Y, or Z axis. you can also move objects around using the grab tool. While objects are selected press G to grab the selection move your mouse and click to place the object in the scene. PRess Esc or G again to cancel the current grab operation.
Rotate [R]: Reveals the rotation gizmo, drag the rings of the gizmo to rotate the object along the X, Y, or Z axis.
Scale [Y]: Reveals the scale gizmo, drag the center cube of the gizmo to scale the object up or down.
Grid Tools

Toggle Transform Space [Z]: - regarding the transform space-- It's changing the transform gizmo to be oriented to the World XYZ vs. the Object's XYZ. You won't really see a difference until you rotate the object. like, rotate a car 45 degrees. Then, to go 'forward', you'd want to switch to the object's local axis
Transform Pivot [X]: Sometimes placing an object can be tough if the model's pivot point is set incorrectly. You can change how the pivot is caluclated using this dropdown menu. Can be set to center, bottom, or selection.
Toggle Snap mode [C]: Sometimes you may want to move and object with a prevision position or rotation. To do this toggle the snapping mode by clicking on the magnet icon. You can set the translation and rotation snap settings by using the dropdown menus.
Snap Mode Controls: determines how precisely your transformation tools are applied
Toggle Grid Visibility: Shows/hides the grid on 3D grid. In placement mode, objects canbe placed on top of other objects or the grid. When building verticailly it can be useful to change the grid height
- Press
=to increase grid height - Press
-to decrease grid height
- Press
Rendering

Render mode: allows you to control how elements are displayed or blended in the viewport. You can switch between various modes such as unlit, lit, shadows, wireframe, or normal to display shadows and other visual effects.
Viewport Overlays: displays additional visual aids in the viewport, including interaction guides, render statistics, and axis indicators. These overlays provide contextual information to help you better understand and manipulate your project.
Play Mode: enables you to preview scripts and other dynamic behaviors in your project. You can also listen to the audio, play videos, and view animations to see how they will perform in real-time.
Launch

Press this button to deploy your project to the metaverse. By clicking ‘Deploy to the Metaverse,’ you’ll open the publish dialog, allowing you to edit your scene’s details before publishing. Later, this button will also enable you to create verses to view any changes you make in your projects in the metaverse.
Viewport Panel
The viewport shows a preview of your verse where you can select and move objects.
Note that whatever the viewport is looking at when you publish the scene to MUD will be the verse's thumbnail image.
Object Selection
You can select objects by clicking on them (hold shift to select multiple objects).
Camera Movement
Left click and drag to orbit around your scene. Hold the right mouse button to enter fly mode where you can use your mouse to look around the scene and the WASD keys to move the camera. Press the F key to focus the selected objects.
Transform Gizmo
When you have one or more objects selected, the transform gizmo will appear.
Hierarchy Panel
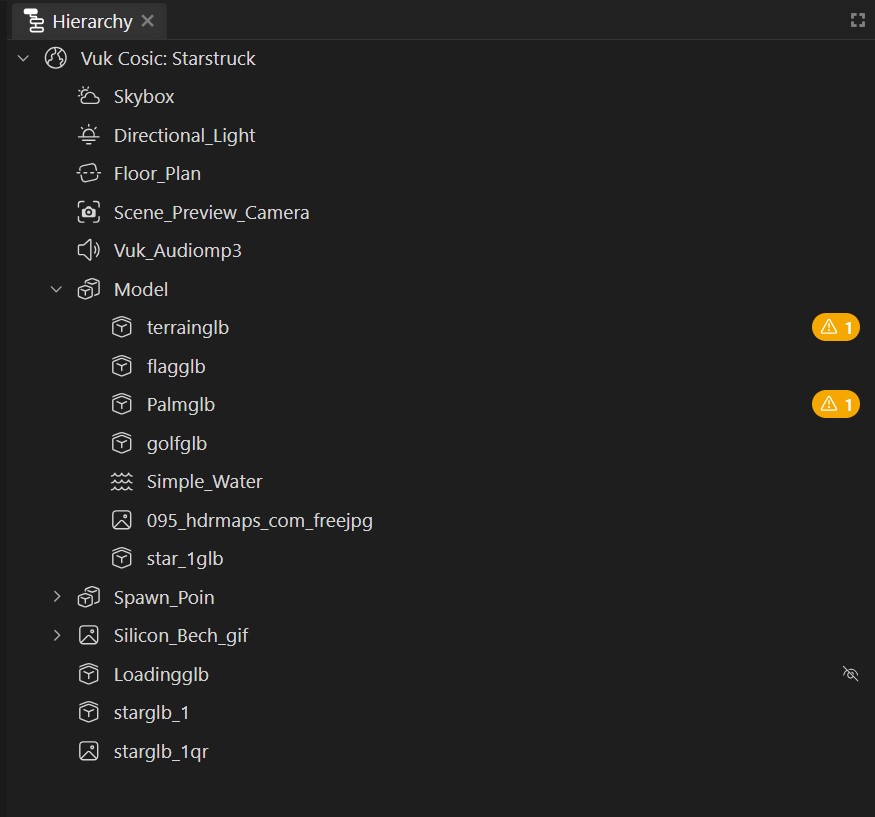
Objects you add to the scene show up in the hierarchy panel. Double click the object focus it in the viewport. You can drag objects inside the hierarchy panel to reorder or reparent them. You can also drag drop items from the assets panel and files from your computer into the hierarchy panel to add them to your scene.
Properties Panel
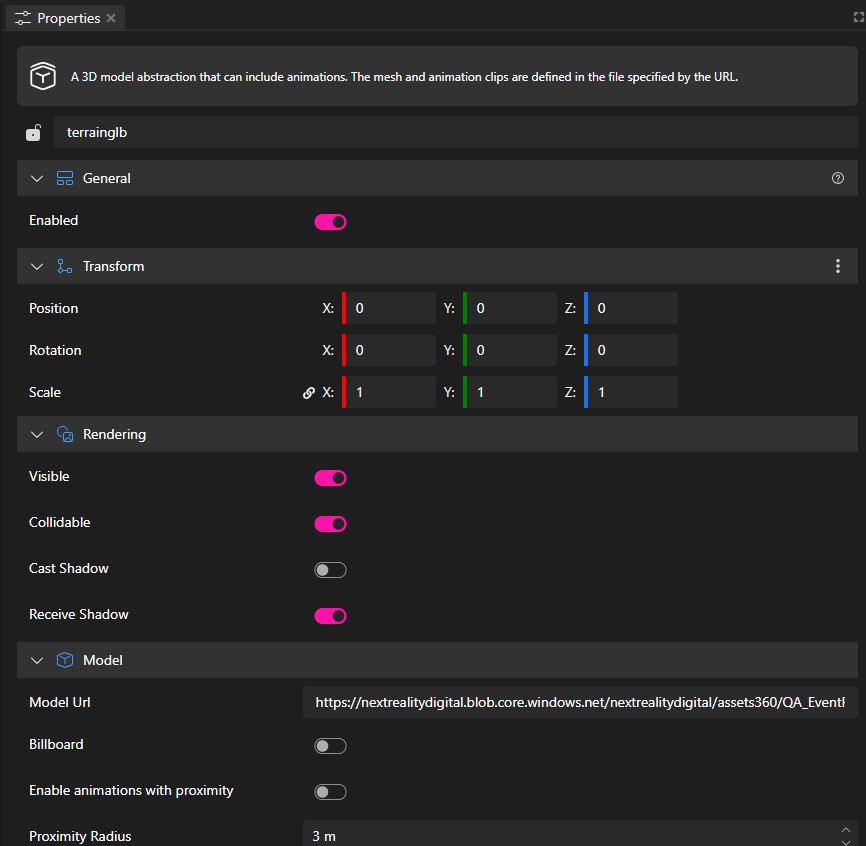
Additional object properties can be set in the properties panel. This includes things like shadows, light color, and more.
Objects are added to Creator and can be customized by changing their properties. Different types of objects have different properties available to them (for example, a light will have an "intensity" property, but a 3D model won’t). Most objects will have transform properties, which represent the physical position in the space.
You can see the properties of objects in more detail in their dedicated section in the documentation.
Root properties
You can customize the properties of the root of the scene.
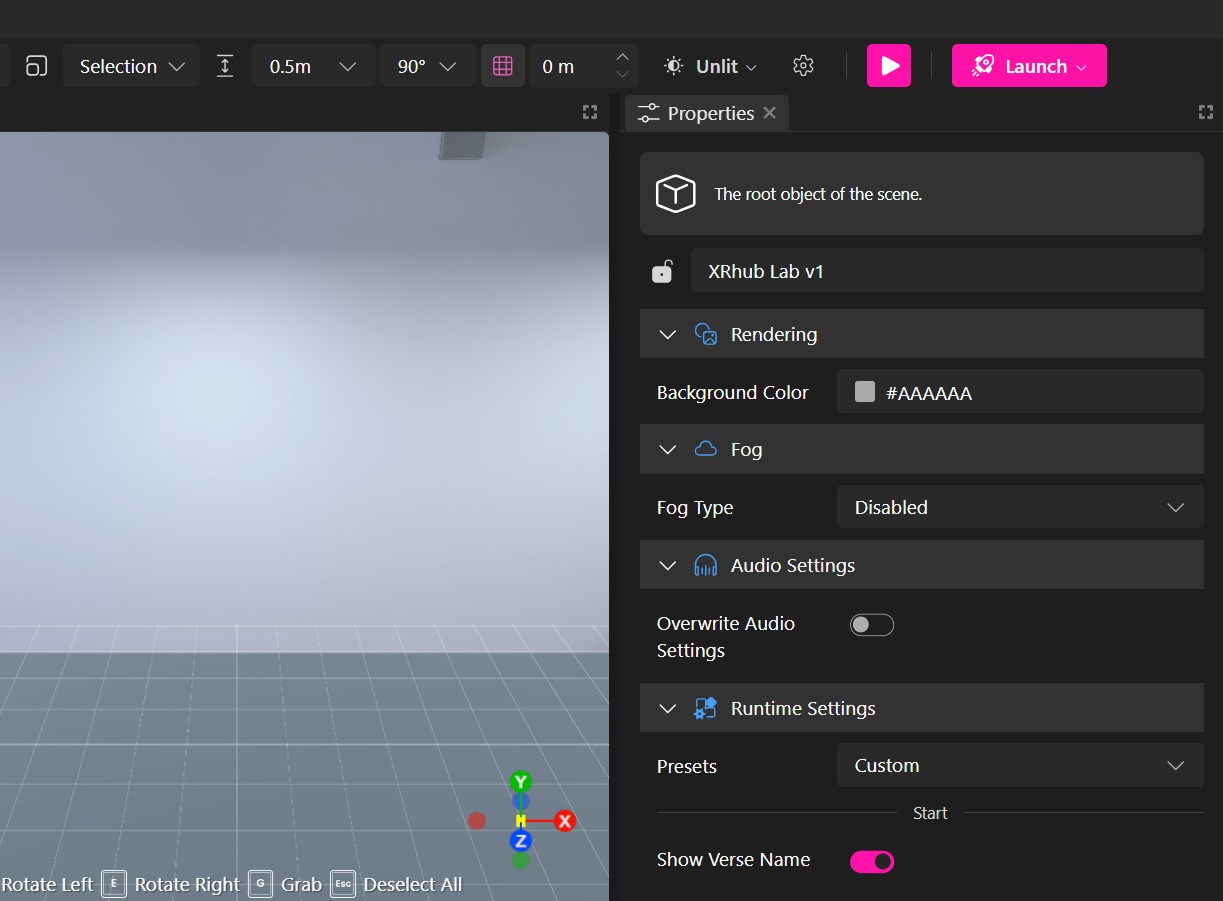
- Background Color: allows you to change the background color of your scene. Usually the change appears behind the skybox.
Invisible avatars: Tailored for 360 tours allows you to hide the avatar within the scene. When you activate this feature, the avatar becomes invisible to prevent users from overcrowding in 360 spaces when they are unable to move.
Fog type: The XR Creator Studio provides two types of fogs. The linear fog you can specify the minimum and maximum distance, the areas that are closer than the minimum distance will not appear to alter; those that are further than the maximum distance will appear with the color of the fog. With the exponential fog only the density is specified, you must put in a very small value to be able to see distances further away.
Override audio seetings: allows you to modify the audio behavior for the entire scene, while also enabling adjustments to different types of audio within the scene.
Config Manager
The runtime settings component in the properties panel allows you to manage all configurations of the verse through a single component. You can use presets for AR, MR, and VR or minimal projects, but you can also create a custom configuration for your project.
The different sections include all the dialogs shown and the options allowed in each one. For example, in the Audio and Video dialog, you can decide whether to show microphone elements or only camera elements. In the Avatar dialog, you can choose whether to show the option to change the name or change the avatar. Let's see these options in more detail:
Start
This refers to the entry UI of the metaverse. The current options can be enabled or disabled:
Show verse name: Enables or disables the name of the Verse in the entry screen.
Show exit button: Enables or disables the X or close button of the Verse in the entry screen.
Animate preview verse: Enables or disables the floating animation in the entry screen of the metaverse while the user is in the lobby.
Enable join enable VR: Enables or disables the Join Verse button.
Enable AR: Enables or disables the Enter on AR button.
Enable look around: Enables or disables the Look Around button.
Enable settings: Enables or disables the settings button in the entry screen.
Show powered by: Shows or hides the 'Powered by MUD Foundation' text.
Audio & Video
- Show speaker: Hides the microphone dropdown in the entry screen and the option to have a microphone in the Verse.
Avatar
Show name: Enables or disables the option to change your name in the Verse.
Show preview: Enables or disables the preview of the avatar in the entry screen.
Allow change: Disables or enables the Change avatar button in the entry screen.
Avatar networking: Disables networking in the Verse, making users unable to communicate via voice chat or text chat.
Avatars visible: Disables visibility of the avatars in the Verse, users will only be able to hear but not see each other's avatars.
Capabilities
Show UI: Enables or disables the main UI/toolbar inside the Verse.
Allow chat: Enables or disables the chat icon and possibilities inside the Verse.
Allow media: interaction: Enables or disables the option to upload or position media.
Allow emoji: Enables or disables the emojis icon in the toolbar.
Allow camera: Enables or disables the option to share your camera or screen.
Allow inspect objects: Enables or disables the option to open the 3D UI of the objects in the Verse.
Show joysticks: Enables or disables joysticks to move on mobile.
Show cursor: Enables or disables the cursor in the Verse.
Shortcuts: Enables or disables all keyboard shortcuts in the Verse.
Idle: Disables the idle screen when the user stays idle for a long time in the Verse.
Resources Panel
You can find content to add to your scene in the assets panel. You can click on assets to add them to the scene. Assets can also be dragged from the assets panel and dropped onto the viewport, hierarchy panel, or properties panel.
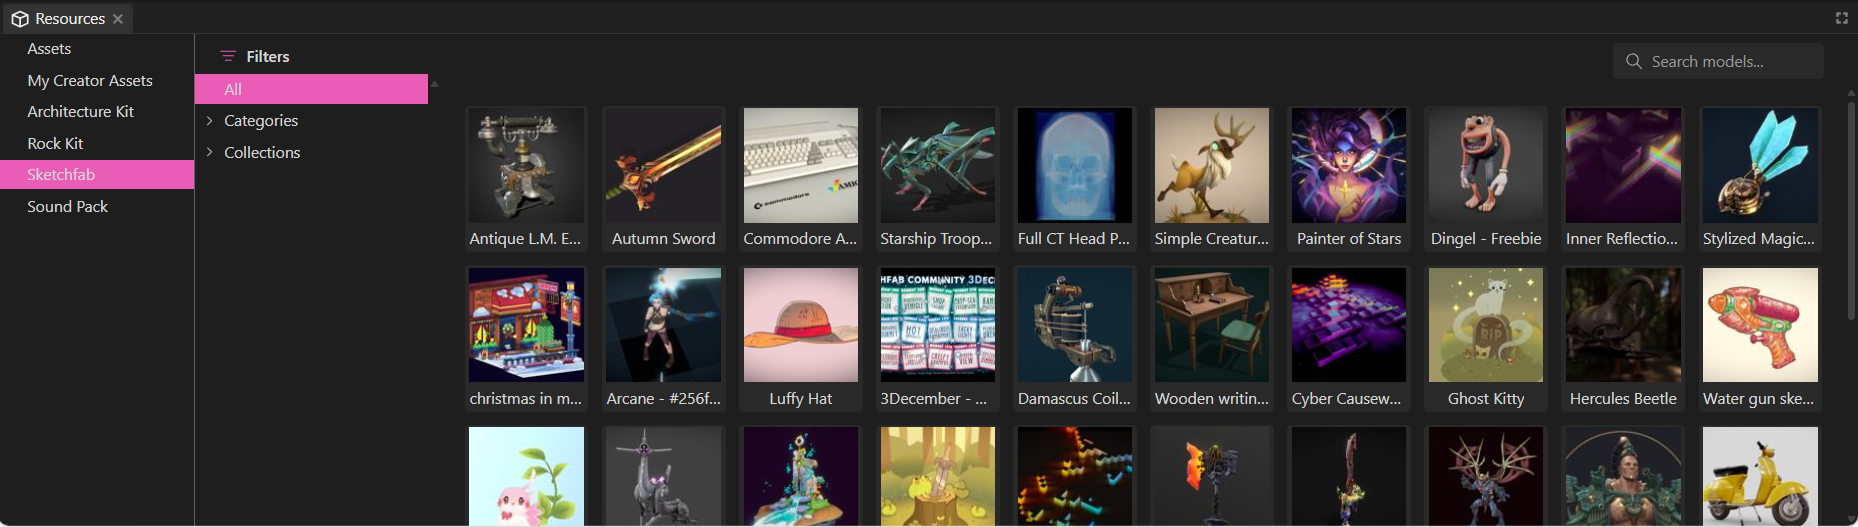
On the left side of the assets panel are a list of sources:
Assets: Upload and search your own 3D models, images, videos, and audio.
Architecture Kit: The Architecture Kit contains pieces that can be put together to construct a wide variety of structures. This kit contains floors, walls, stairs, and more.
Rock Kit: The Rock Kit contains a collection of realistic rock models that can be used to add detail to terrain, construct platforms, or anything else you might need a rock for.
Sketchfab: Sketchfab is an online marketplace for 3D models. It contains a wide variety of high quality models to help you fill out your scene.
Sound pack: A source of public available ambient sounds.