Landings
The Landings section allows administrators to manage, upload, and organize custom landing pages. By providing the HTML code of your site, you can link each landing directly to a specific route within the platform and gain a view of your website's content and layout.
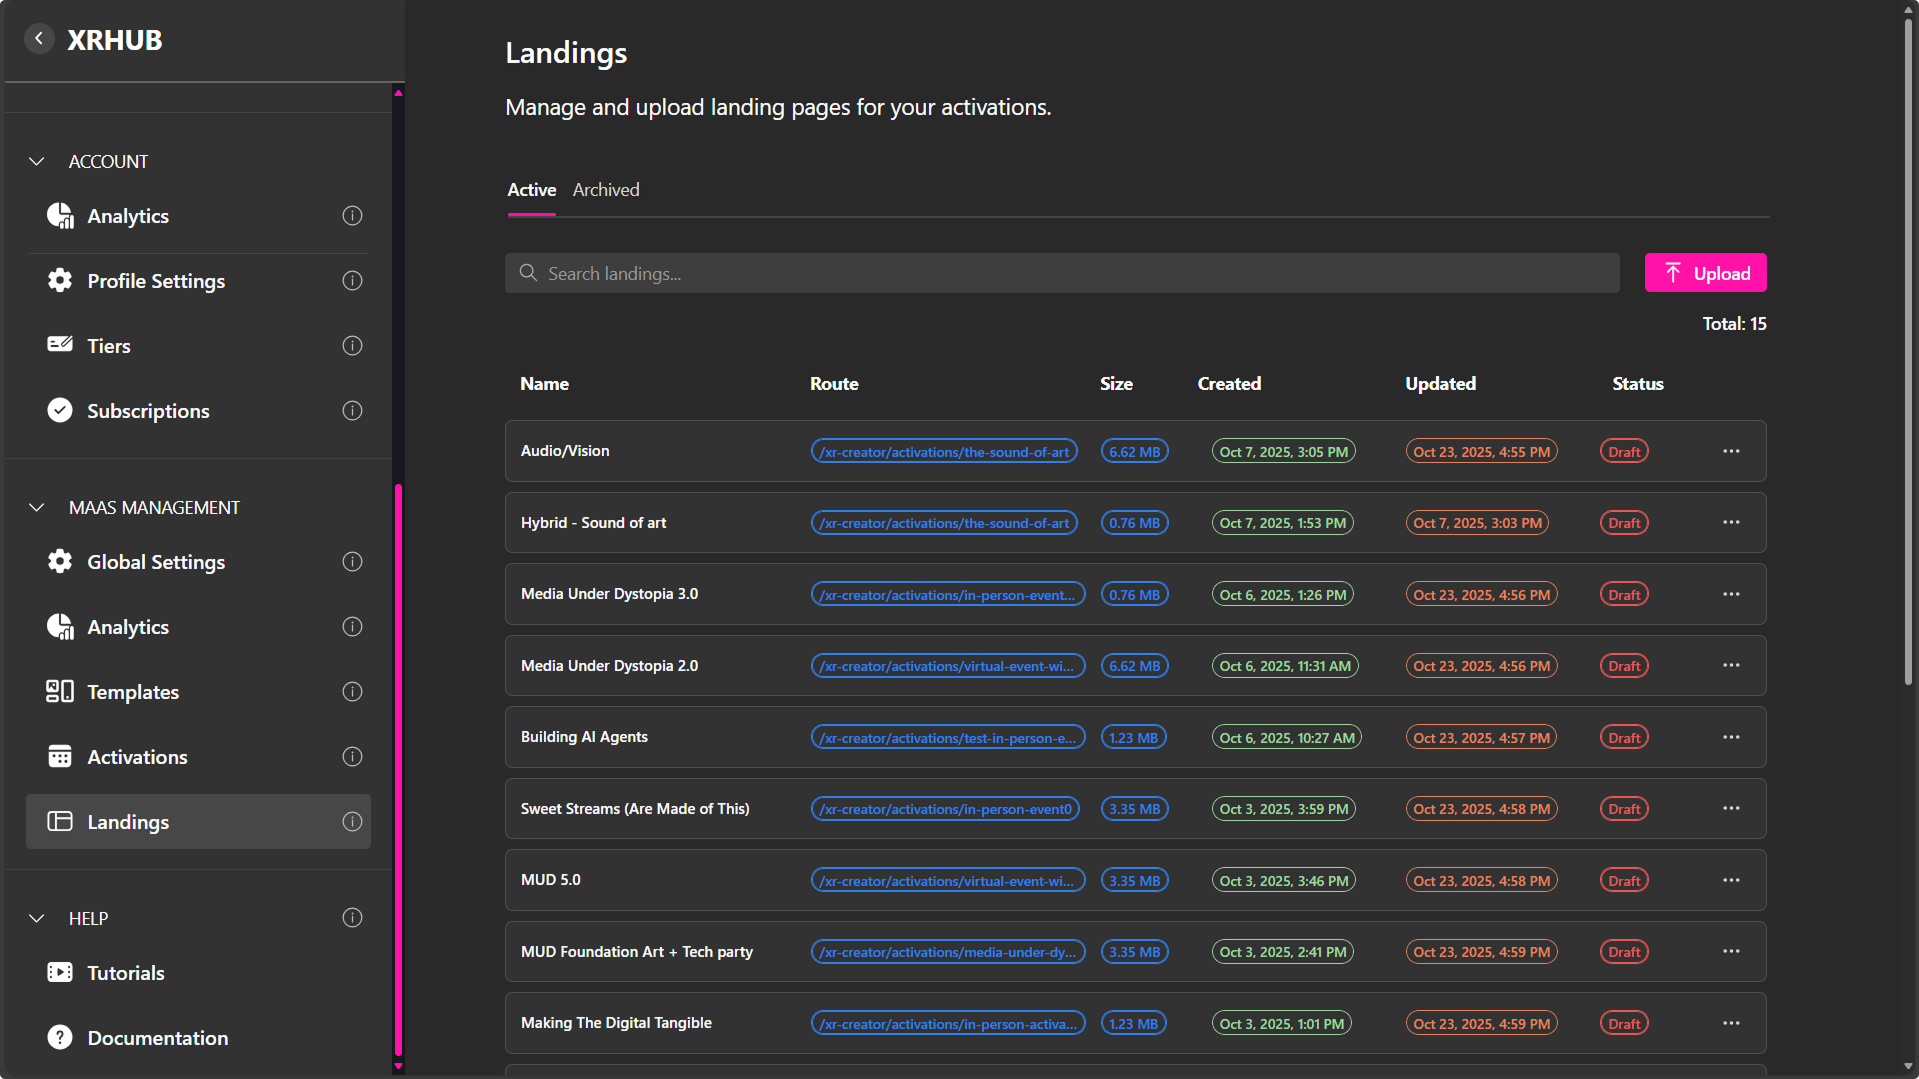
The Landings Dashboard provides a centralized view of all active and archived landing pages associated with the platform. Each entry displays key information such as the page name, route, file size, creation and update timestamps, and publication status.
At the top of the page, you’ll find:
- Active / Archived Tabs – Switch between currently used landing pages and archived ones.
- Search Bar – Filter pages by name or keyword.
- Upload Button – Add a new landing page to the system.
- Total Counter – Displays the number of landing pages currently available (e.g., “Total: 15”).
Landing Management Overview
Each row in the dashboard corresponds to a single landing page and includes the following information:
| Column | Description |
|---|---|
| Name | The title of the landing page (e.g., Audio/Vision, Media Under Dystopia 3.0). |
| Route | The unique URL path connecting the landing page to its activation (e.g., /xr-creator/activations/the-sound-of-art). |
| Size | File size of the landing page package in megabytes (MB). |
| Created | Date and time the landing page was first uploaded. |
| Updated | Timestamp of the last modification. |
| Status | Indicates the publication state (e.g., Draft or Published). |
Uploading a Landing Page
Clicking the Upload button opens the Upload New Landing window, where you can add and configure a new landing page.
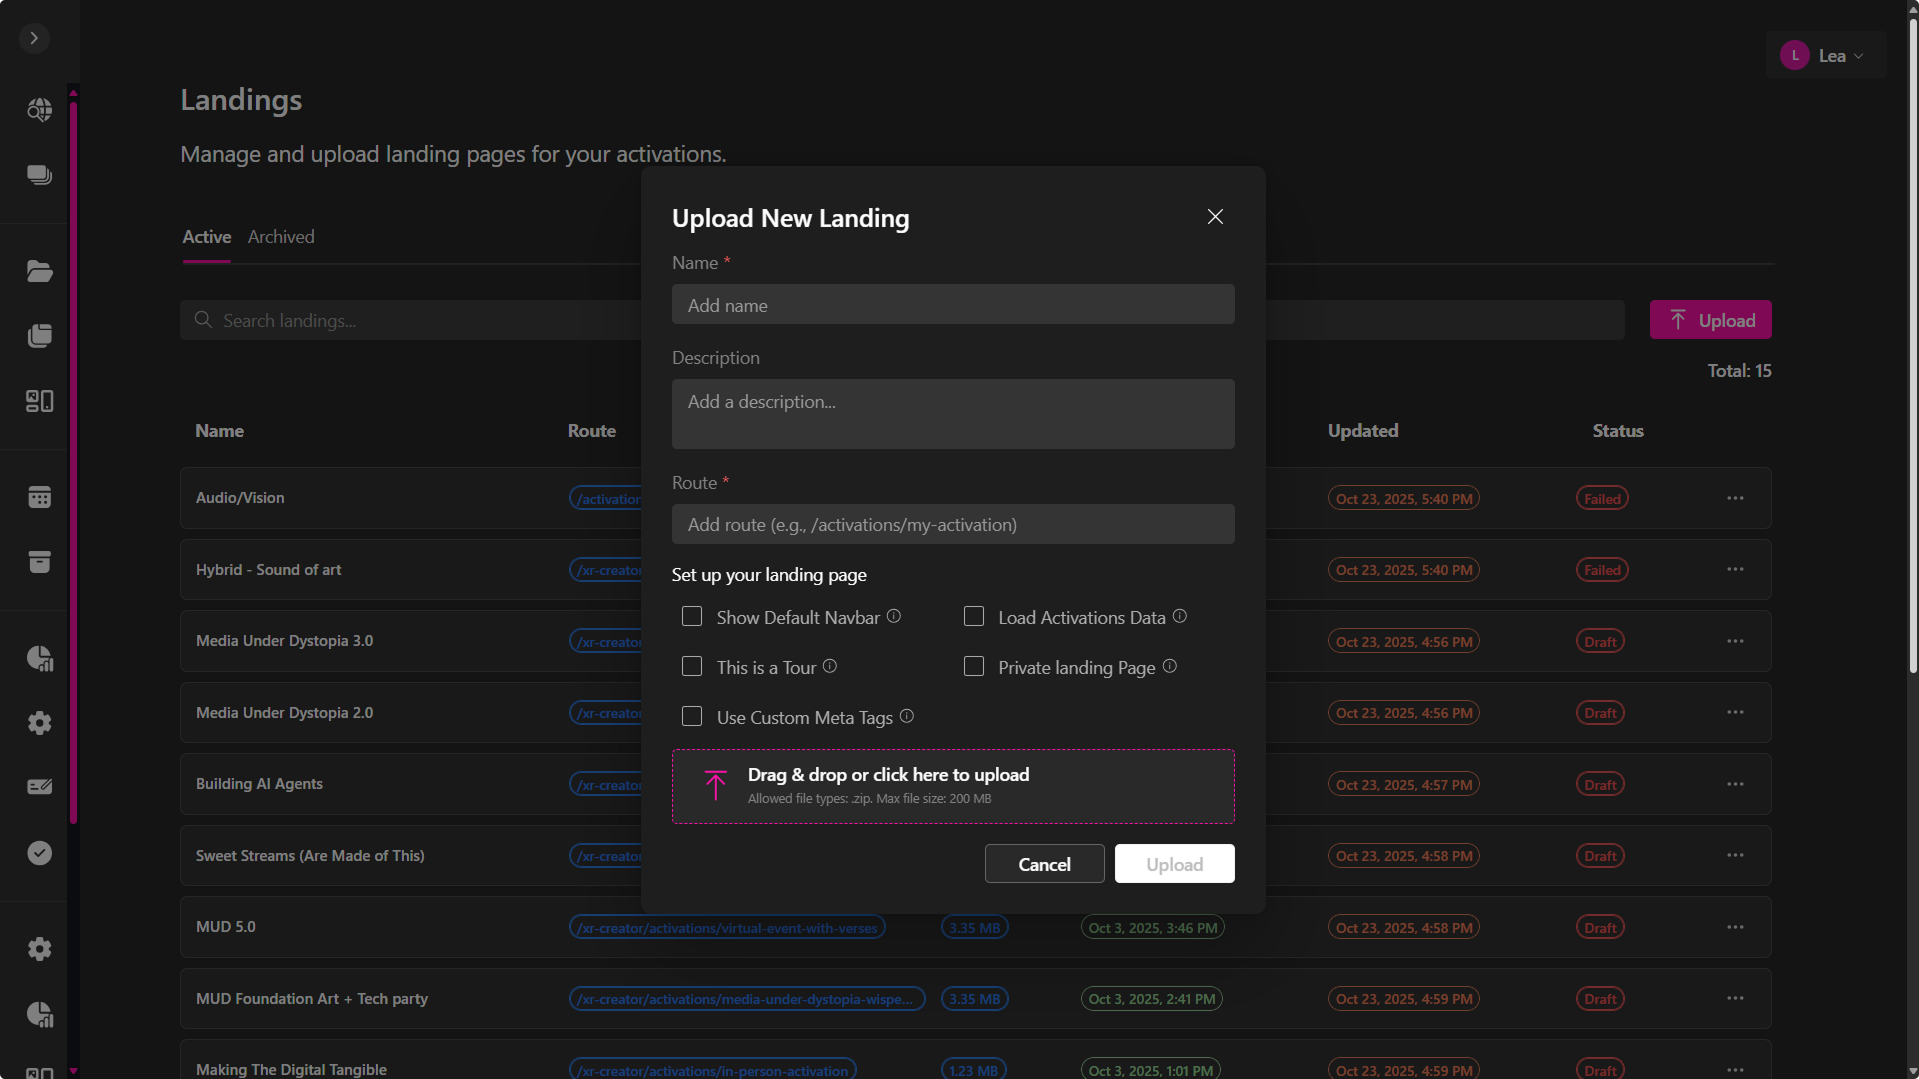
Upload Fields
| Field | Description |
|---|---|
| Name | The title of your landing page. This appears in the dashboard and identifies the page. |
| Description | A short summary describing the landing page or its purpose (optional). |
| Route | The URL path that defines where the landing page will be accessible (e.g., /, /activations/my-activation). |
| File Upload | Upload a .zip file containing your landing site. |
File Requirements
- Allowed file type: .zip
- Maximum size: 200 MB
Important:
Your ZIP package must follow the correct structure:
index.htmlmust be at the root of the ZIP- Supporting folders like
/css,/js,/fonts,/imagesmust be at the same level
Example structure:
/fonts
/images
/js
401.html
404.html
index.html
Once uploaded, the landing will appear in the Active list with a Draft status until you publish it.
Landing Management Options
Each landing entry includes a context menu accessible through the three-dot (⋮) icon.
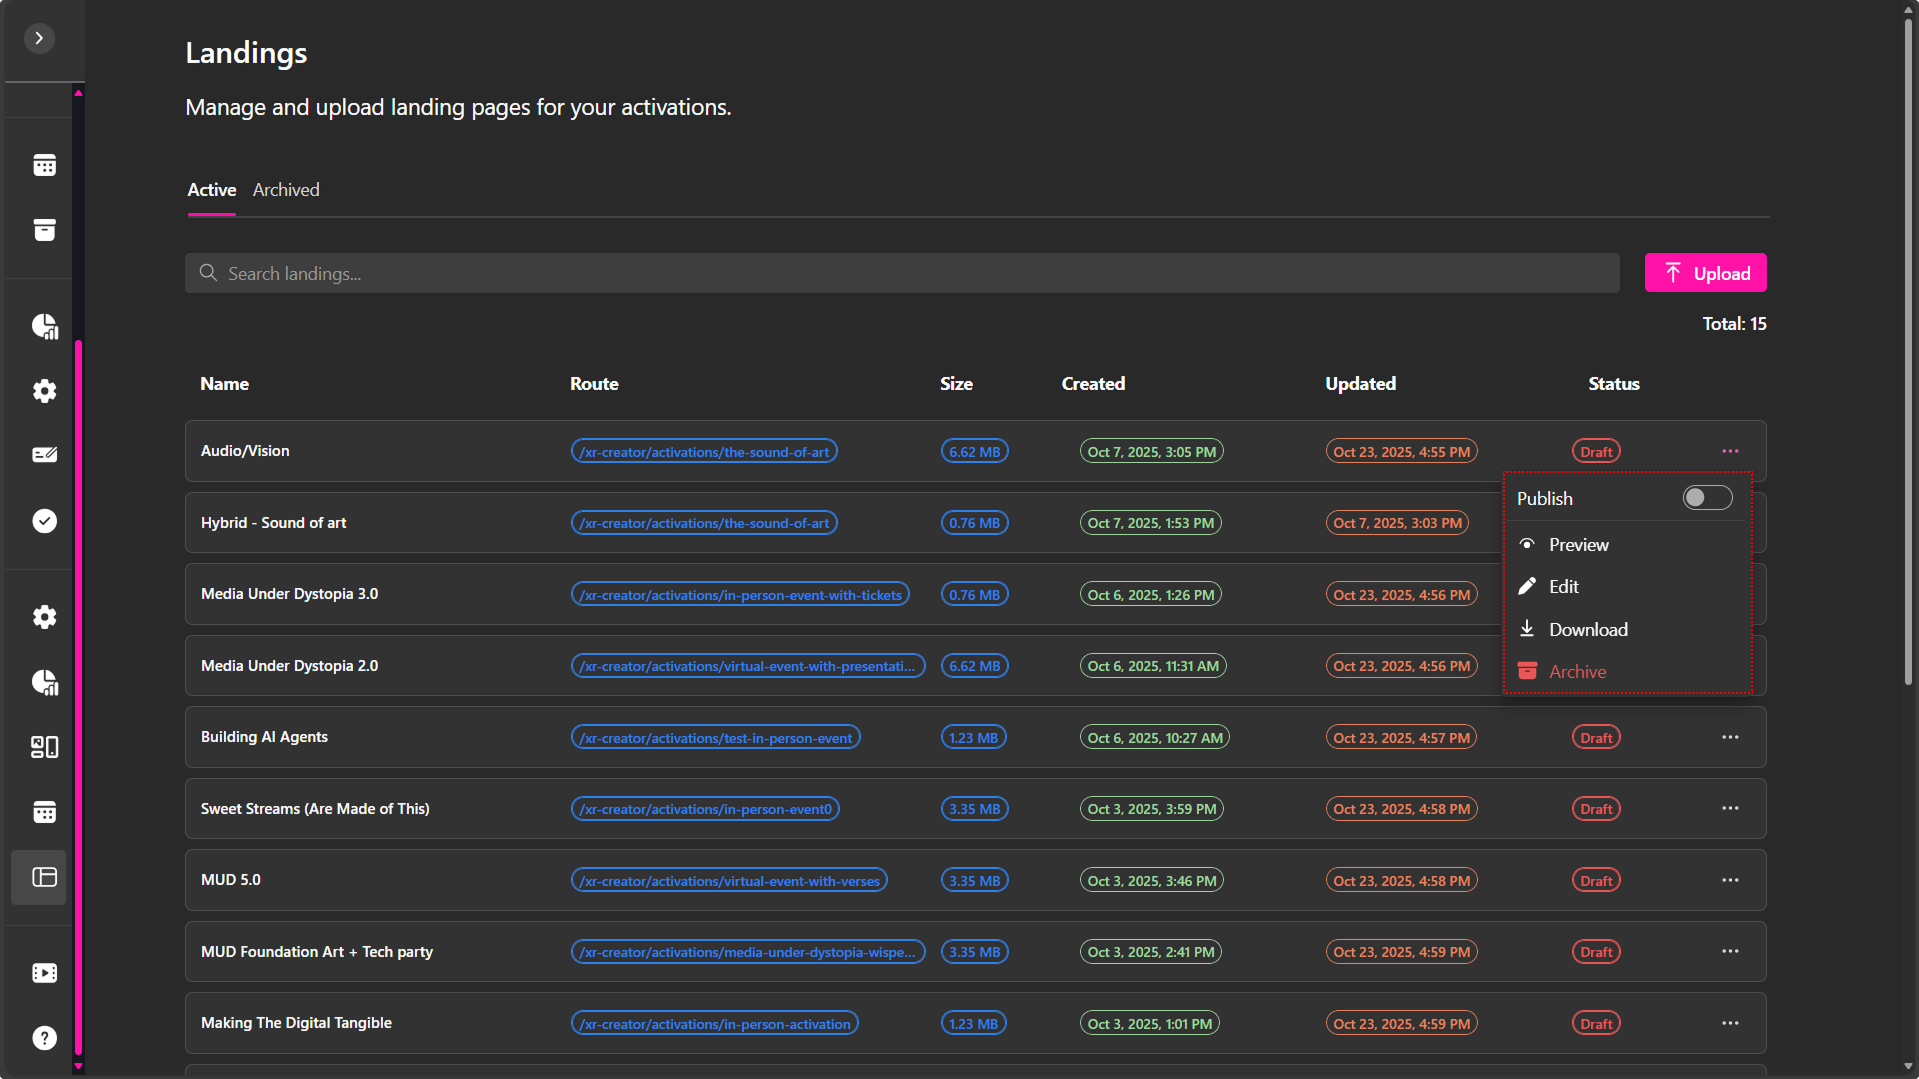
From this menu, administrators can manage, preview, or publish pages as needed.
-
Publish: Toggle to make the landing page publicly accessible. When published, the landing page becomes available at its designated route and linked activation.
-
Preview: Opens a preview of the landing page in a new window, allowing you to review its layout, media, and content before publishing.
-
Edit: Opens the landing page for modification. Use this option to update content, replace assets, or revise text before republishing.
-
Download: Downloads the landing page package (HTML/CSS/JS files) for local editing or backup.
-
Archive: Moves the landing page to the Archived tab. This helps declutter the active list without deleting the page permanently.
Active and Archived Tabs
- Active Tab – Displays all landing pages currently available for use or under development.
- Archived Tab – Contains older or unused landing pages that are stored for reference or future reactivation.
Administrators can switch between these tabs at any time to review or restore archived content.
Changing the Homepage with Custom Landings
You can replace the default homepage of your XR MAAS platform by assigning a custom landing page to the root path.
Setting a Landing as the Homepage
- Upload a landing page as usual.
- Set the Route field to:
/ - Publish the landing.
Once published, your custom landing becomes the homepage of your dashboard.
This allows complete freedom over the branding and entry experience for visitors.
Dynamic Logged-In User Display
Custom landing pages—especially homepages—can display dynamic user information when a visitor is logged in. To enable this, your navbar must include specific CSS classes the system recognizes and auto-populates.
These classes allow XRHUB to show or hide the correct UI elements depending on authentication state.
Required Classes
Assign the following classes to your page:
-
login-buttonApplied to the Sign Up / Login button. Visible only when the user is NOT logged in.Example:
<button class="login-button">Login</button> -
user-buttonContainer for the logged-in user button. This is the main container that should be hidden. -
user-button-backgroundBackground styling (avatar circle or block). -
user-button-textText inside the user button (usually user’s name). -
user-menuDropdown menu container. -
user-menu-nameDynamically displays the user’s name. -
user-menu-emailDynamically displays the user’s email. -
logout-buttonProvides a logout action and returns the user to the sign‑in state.
Implementation Notes
- Login Button
Your login/signup button must use:
Example:
<button class="login-button">Login</button>
This ensures the system can hide it when a user is logged in.
Hidden User Button Structure
Before login, the user menu should remain hidden. You can insert additional containers or classes as needed, but the overall structure must preserve the defined hierarchy.
Once authentication occurs, XRHUB will:
-
hide the
login-button -
show the
user-buttoncontainer -
automatically populate:
-
user-menu-name -
user-menu-email -
logout-buttonlogic.
-
Example template:
<!-- Shown only when NOT logged in -->
<button class="login-button">Login</button>

<!-- Shown only when logged in -->

<div class="user-button">
<div data-delay="0" data-hover="false" class="user-button-background w-dropdown">
 <div class="dropdown-toggle-5 w-dropdown-toggle">
   <div class="user-button-text">D</div>
 </div>
 <nav class="user-menu w-dropdown-list">
   <div class="container-email-name">
     <div class="user">
       <h4 class="heading-h4-size menu user-menu-name">John Doe</h4>
     </div>
     <div class="email">
       <div class="user-menu-email">johndoe@gmail.com</div>
     </div>
   </div>
   <a class="link-navegation w-inline-block logout-button">
     <div class="text-block">Logout</div>
   </a>
 </nav>
</div>
</div>
Connecting Landings to Activations
Each landing page can be directly associated with a specific activation or event route.
This ensures users are presented with a branded landing experience before entering an XR environment.
Typical use cases include:
- Event registration or RSVP forms
- Pre-show information pages
- Sponsor or partner showcases
- Interactive previews or countdown pages
To connect a landing page to an activation, ensure that the route path matches the activation’s defined URL in the system.
Uploading a Custom Landing Page for Activations
To upload a custom landing page, you must already have an activation created.
Before starting, make sure you have:
-
The activation URL
Locate the URL of the existing activation. It should follow this structure:
/xr-creator/activations/the-sound-of-art -
A ZIP file containing your landing files
Prepare a.zipfile that includes your HTML and all required assets.
Refer to our Custom Classes for Activations documentation for technical requirements and supported structure. -
A name for the landing page
Choose a clear and descriptive name to identify the custom landing. -
After you have them, fill in the corresponding fields in the upload form.
-
Click Save.
-
Open the context menu of the newly created landing page.
-
Click Publish.
Once published, the activation (event) will display the custom landing page instead of the default one.
Custom Classes for Custom Activations
Custom classes can be added to your HTML elements to enable specific interactive features, such as RSVP buttons, activation timers, and dynamic program sections.
RSVP Button
To enable the RSVP button for activations and allow users to confirm their attendance, add the following class to your RSVP button element:
rsvp-button
Example:
<button class="rsvp-button">RSVP Now</button>
Share Button
To enable a share button with the shortlinks and QR code to access your activation, add the following class to your Share button element:
share-button
Ticket Button
To enable ticket access for in-person or hybrid activations, add the class:
ticket-button
This should be applied to the button that users click to view their activation tickets.
How to Enable a Timer in Activation Landings
Add the following required classes to your HTML structure to display a countdown timer:
timer
days
hours
minutes
seconds
Example:
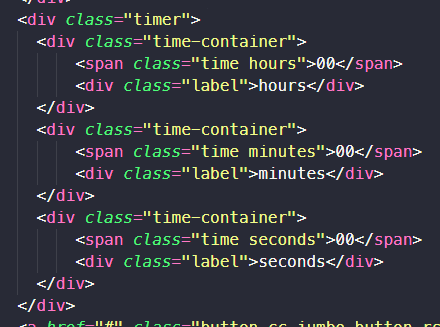
These elements must exist in the layout so the system can inject the remaining time dynamically.
How to Enable Dynamic Programs in Custom Landing Pages
To enable dynamic activation programs, specific classes must be added in an organized hierarchy. These allow the system to recognize and populate activation schedule data correctly.
You only need to create one calendar day and one presentation as a base structure — the platform will replicate it dynamically.
Required Classes:
program
program-day
program-day-text
program-presentations
program-presentations-list
program-presentation
program-presentation-time
program-presentation-image
program-presentation-name
program-presentation-description
program-presentation-button
program-presentation-presenters-list
program-presentation-presenter
program-presentation-presenter-name
program-presentation-presenter-image
program-presentation-presenter-bio
Example:
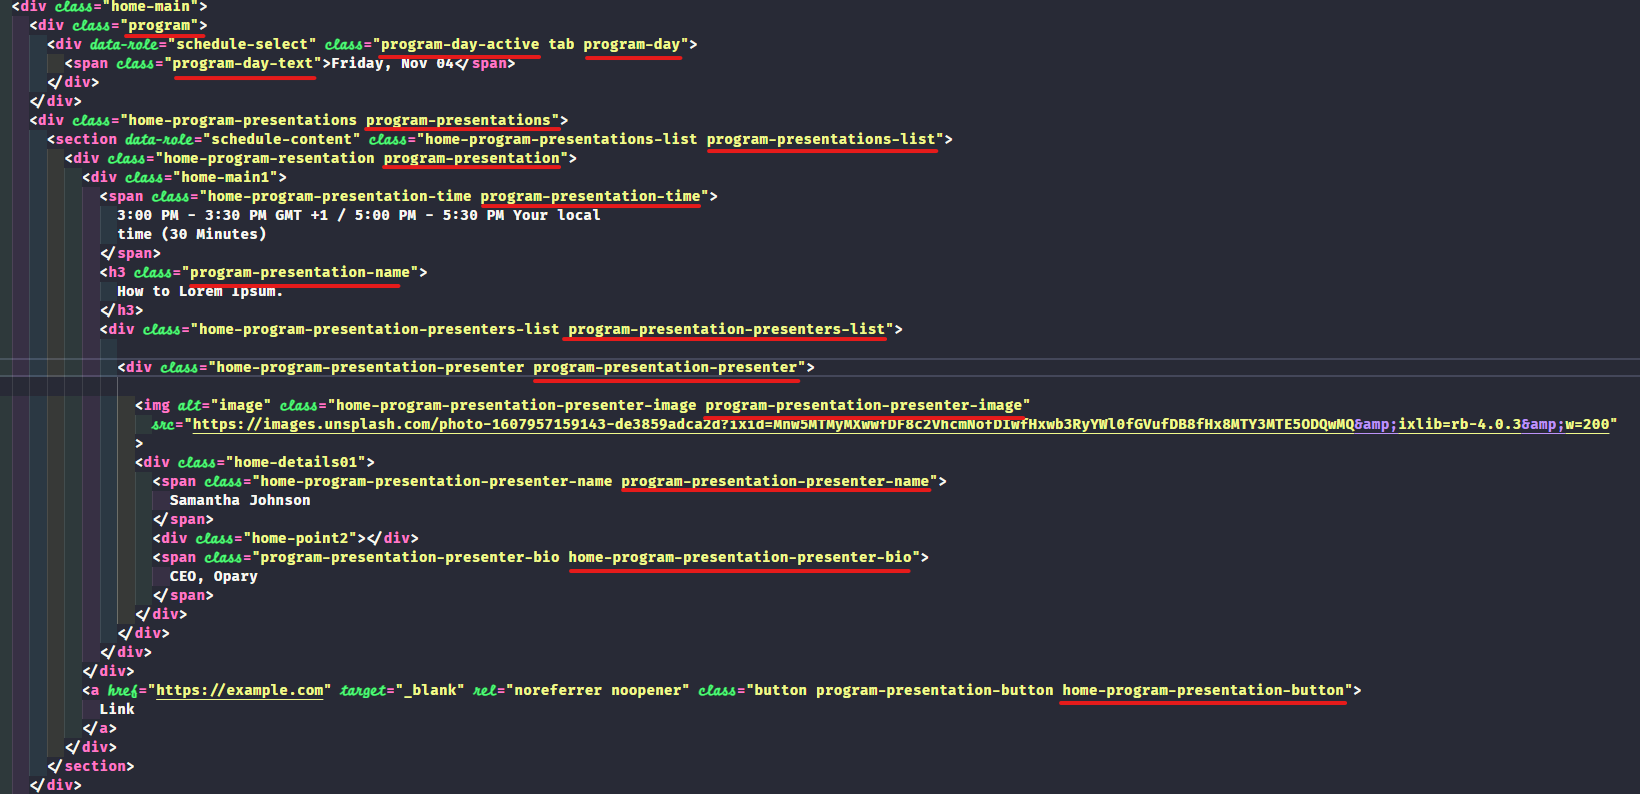
These classes ensure that all schedule elements (days, presentations, speakers, and times) are properly displayed and dynamically updated.
💡 Pro Tip:
Before uploading, test your landing locally to confirm that all asset paths (CSS, JS, images) load correctly and that custom classes behave as expected. This prevents missing styles, broken layouts, or unresponsive buttons after deployment.
Notes
- Only administrators or authorized creators can upload and publish landing pages.
- Archiving does not delete content — archived landings can be restored anytime.
- Ensure each landing page route is unique to prevent conflicts with activations.
- Preview pages before publishing to confirm layout and functionality.
- Use consistent naming conventions for easy identification and organization.